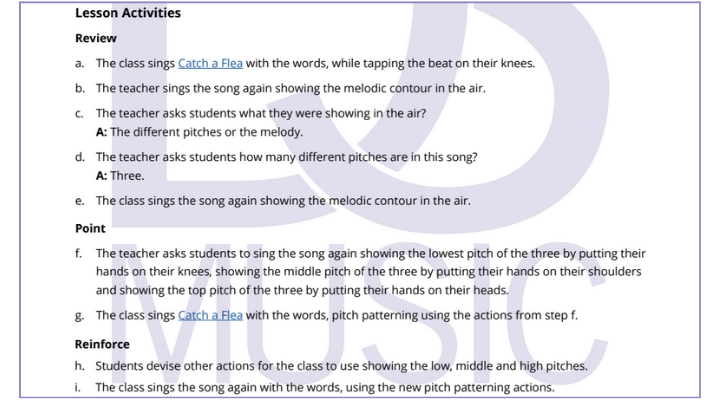
Read on for ideas for how to use these rhythm-based activities in lessons, rehearsals or practical classes on instruments. These activities are adapted from singing-based versions available via the Music Teachers’ Digital Library (note, only accessible with a subscription).
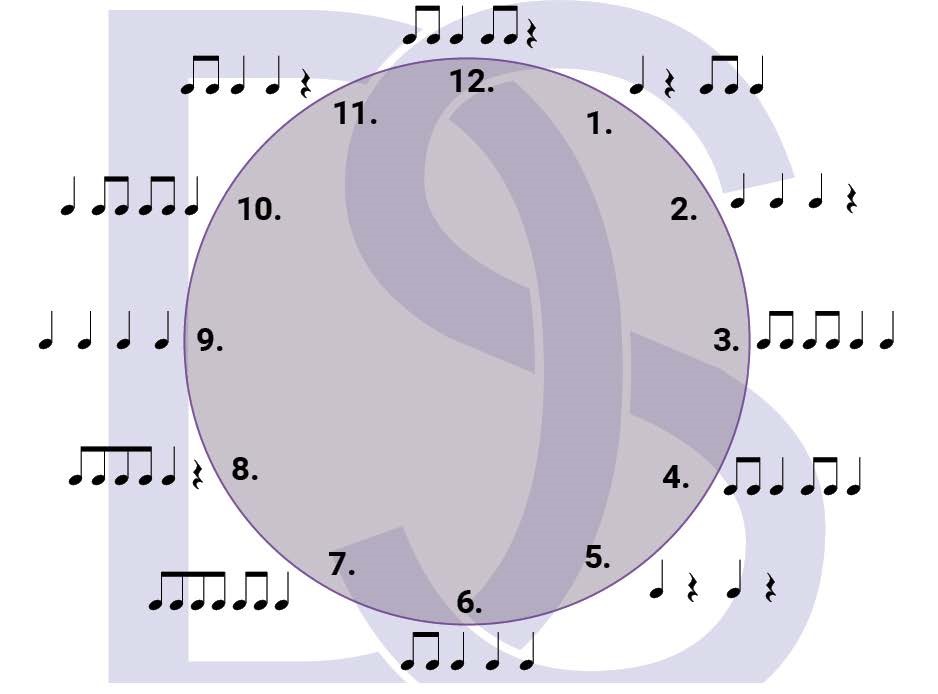
In this activity, students perform rhythmic patterns according to the time on a rhythm clock.
Step 1. The teacher displays this Rhythm Clock 1 for students to see (using computer connection, digital projector or similar).
Step 2. Students keep the beat by tapping their feet and perform the rhythms they see by playing all four beat rhythms (on a single repeated note) beginning at 1 o’clock, moving clockwise around the clock.
Step 3. Repeat Step 2., in reverse.
Note: For instrumental lessons rhythms could be performed on instruments on a single note or using the notes in a scale being practiced.
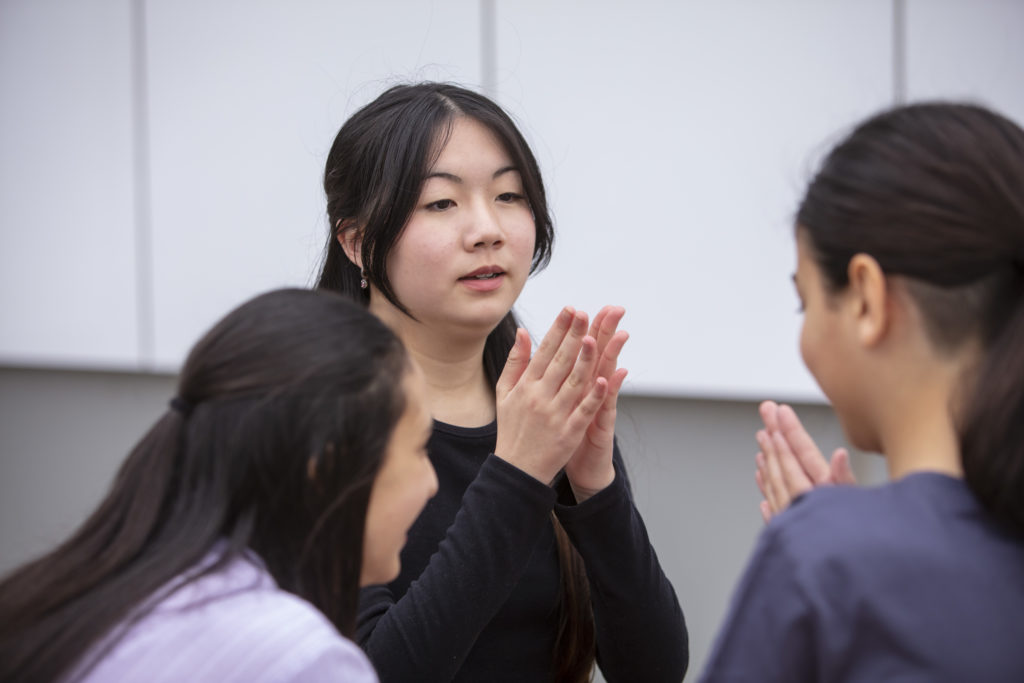
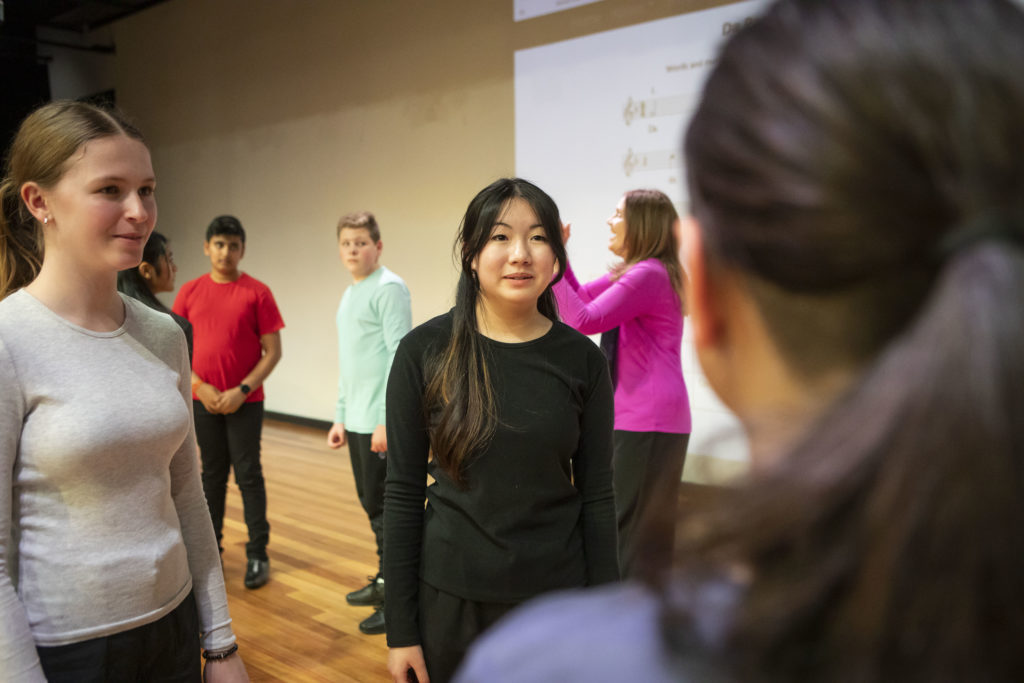
Rhythmic Practice Activity: Clever Echo Canon
In this activity, students perform an immediate clever echo (without clapping and aurally deriving the rhythm first) as a canon.
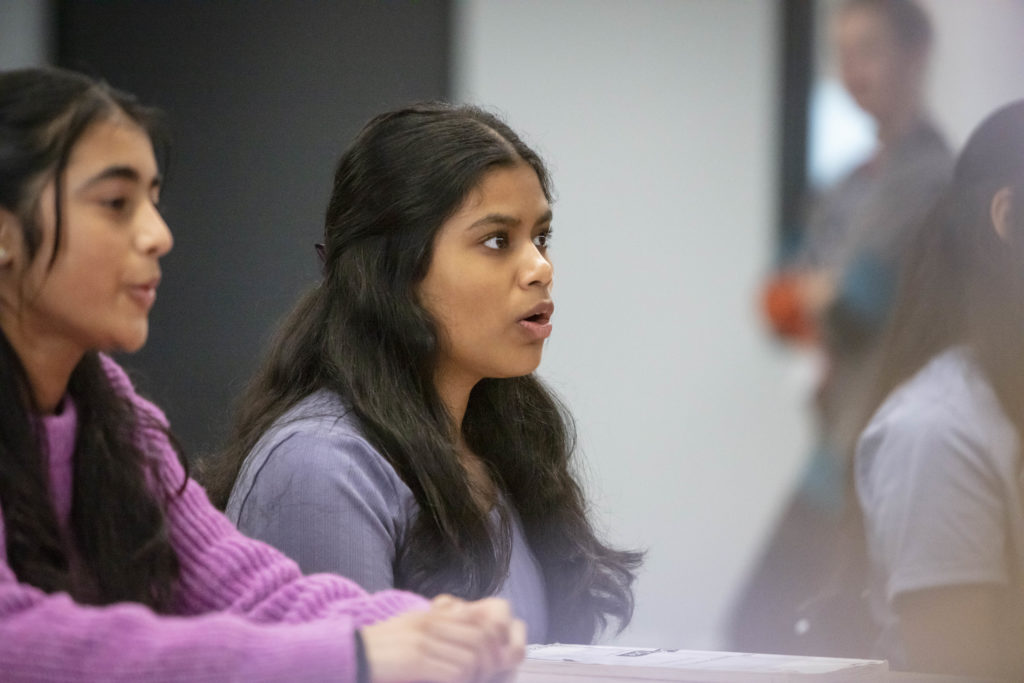
In this activity, students compose a four beat rhythmic ostinato to accompany known songs.
Step 1. The teacher sings a known song, rehearsal work or melody while keeping a steady beat, on a neutral syllable e.g. “doo”.
Step 2. The class identifies it while performing the beat (e.g. on their feet) and clapping the rhythm.
This activity can lead to some good discussion around composing e.g. discuss whether each ostinato is easy/hard/logical etc. to pair with the work and why.
Note: In ensemble classes the ostinato could be performed by a group of students while others play a known song.
Let the Music Teacher’s Digital Library (MTDL) offer you many more rhythm-based practice activities!
Happy practicing, everyone! – Deb
When teaching sequential music learning, long term strategic planning is essential.
The first step is deciding what should be included in your curriculum, then, determining the sequence in which these should be taught and when.
Once the overall sequence has been determined, a teaching strategy is developed for each element or concept based on the Three Ps: Prepare, Present and Practice, ensuring step-by-step learning for students.

Preparation is the most detailed section of a strategy and is divided into Aural Preparation and Visual Preparation steps.
For example, the Preparation steps for a Rhythmic Strategy, should include the following steps in order:
1. Learn repertoire (only includes known elements plus the new element).
Aural Preparation:
2. Sing this repertoire while performing the rhythm, hearing the beat and rhythm simultaneously and performing the beat and rhythm simultaneously
3. Aurally discover that there is a new rhythmic element
4. Aurally discover where the new rhythmic element is
5. Aurally discover everything new about the new rhythmic element
Visual Preparation:
6. Learn what the new rhythmic element looks like.
Keen on exploring this more for melodic elements? Click here.
After preparation is Present / Make Conscious, the shortest and least crucial step of the Three P’s, simply where the new element is named and linked together with its sound & symbol.
Last in the sequence is the Practice segment of a teaching Strategy, which includes a list of at least 12 activities designed to practice, internalise and consolidate the knowledge acquired in the Prepare and Present steps.
The 12 activities should include at least four activities for each Practice Stage: Early, Mid and Late in order of level of difficulty, with approximately three of each Practice Type: Aural, Visual, Written and Creative activities, although there’s much more available in the practice space in the Music Teacher’s Digital Library (MTDL!)
In Kodály-inspired teaching, we use terms like strategy outline, teaching strategy (mentioned above) and teaching focus across our curriculum and planning material.
What do we mean by ‘teaching strategy?’
A Teaching Strategy is the detailed plan for teaching a musical concept/element.
It includes step-by-step directions for the teacher and sometimes the actual wording or script that contains the questions and specific directions for students.
In the outline itself then, the teaching strategy is shown through three main areas.
Objectives/Outcomes/Learning Intentions, which acts as a short summary of what the students will be able to do by the completion of the strategy.
Prerequisite skills/knowledge, or a list all the rhythmic and melodic skills and knowledge that the students already understand.
Plus a Song List for Teaching, containing only the element to be taught and elements already known.
Following these three sections, each teaching strategy carefully sequences Prepare (Discovery), Present (Naming) and ongoing Practice of a concept.
This sort of teaching focus layout is educator directed and well-planned to capture student attention and interest and to ensure true learning and understanding occurs.
When done well, a teaching focus is taking what students know (review), quickly guiding them to the new information (point), and then immediately consolidating that (reinforce) before moving on.
We can see here that students aren’t reviewing everything they know about an element, just what is relevant to the Point section itself. That’s the shortest part of the teaching focus sequence, before ‘Reinforce‘, in order to ensure the new information has been understood.
This is just some of the planning and support information and material that exists in the Music Teacher’s Digital Library (MTDL) for you to teach in this Kodály-inspired way to get your students really knowing!
Happy sequential teaching & learning, everyone! – Deb
As a language, music can speak to us on many levels. For example, emotionally, a piece of music may make us feel uplifted and joyous, and physically, this same piece of music may leave us feeling energised and motivated. We may recognise and understand a composer’s use of form, or be able to hear and appreciate a chord progression.
The practice of being able to decode the sounds we hear is called analysis. The tools of analysis enable us to study or examine music in detail, in order to understand, explain and interpret it.
Essentially, we’re listening to music for what sets it apart, identifying aspects, elements and approaches we can use to elevate our own performances and become better musicians.
So, let’s make a start together.
At the heart of music performance analysis is being able to describe the character or mood of the piece you’re listening to. What expressive outcome does the piece seem to have? How do you feel when you listen to it?
If you had to find some words to describe the character, mood or feeling it creates — what would they be? There’s stacks of word lists for just this sort of thing in Decoding Sound, but best of all, there’s no right or wrong answer because feeling in music is subjective.
Speaking of word lists, its a good idea to start gathering a bunch as a go-to. Angry words, sad words, exciting words and everything in between. Its best if these words are comfortable for you to use because even if what you feel can’t be wrong, you still have to be able to describe and justify it in your answers.
Work: ‘Apollo’
Composers/Creators: Hugo Gruzman & James Lyell
Performers: Flight Facilities, Katie Noonan & the Melbourne Symphony Orchestra
Album: Live With the Melbourne Symphony Orchestra (Future Classic, 2015)
Listen to this excerpt and describe the character or mood of this performance. Does the same character stay throughout the excerpt, or does it change? Remember, there’s no wrong answer, just have a go describing the character with two or three words.
Listening to music for analysis is different to blocking out the world with your favourite jams. It can be tempting to pop on your go-to tunes all the time, and while these might not be a bad place to start your journey, we encourage you to play around with your playlists.
Sure, you mightn’t particularly enjoy every piece you listen to, but remember, your opinion about whether it’s good or not isn’t actually the point. Broaden your musical horizons!
There’s plenty of ready-made analysis activities setup in the Music Teacher’s Digital Library, so why not use those to start building your word lists?
Happy analysing, everyone! – Deb
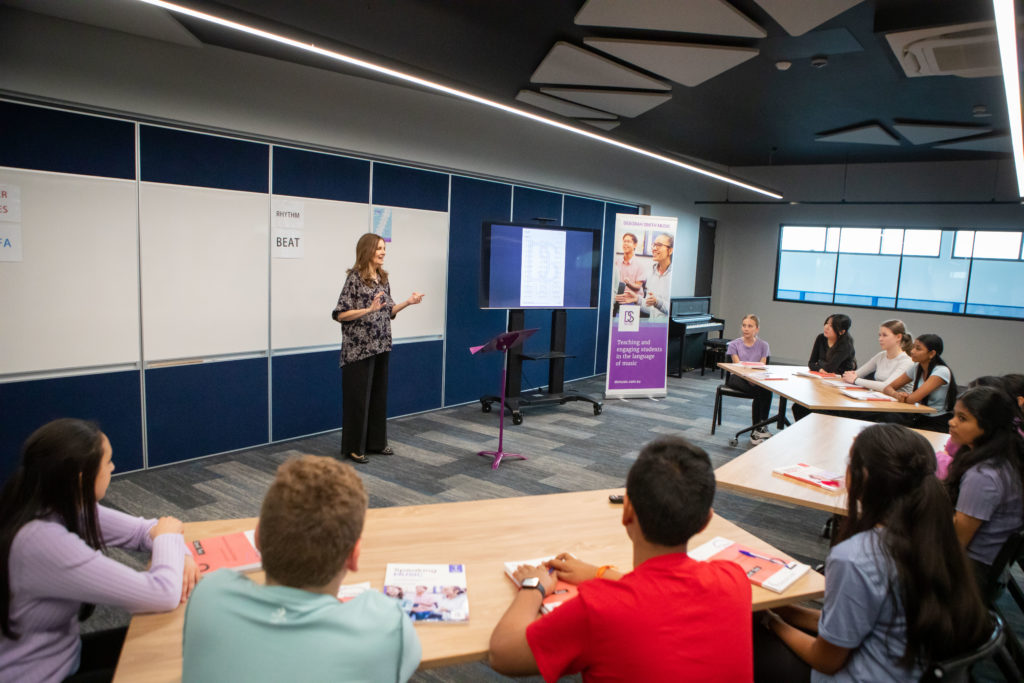
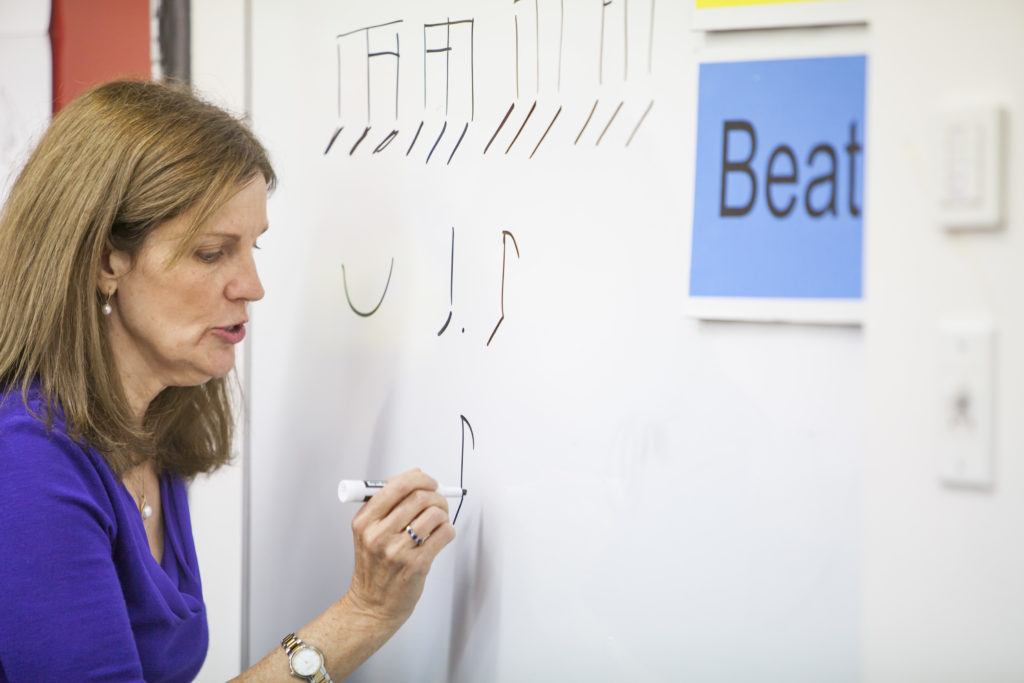
Beat is defined as a regular movement or sound. In music, the beat is a regular, repeated pulse that helps create tempo or speed in music.
Really knowing beat can make all the difference for rhythm so don’t overlook the obvious and practice this concept regularly with all levels of students.
So, here’s a few suggestions for gamifying beat in your classroom, available via the Music Teachers’ Digital Library (note, some are free, but others are only accessible with a subscription).
Let’s start now with A Qua Qua, which is great for teaching & practicing beat. It’s also an opportunity for celebrating diverse music of different cultures as A Qua Qua is a traditional Israeli song.
Students sit in a single circle holding their hands out in front of the people beside them. Their left hand should face up under the person’s hand on their left and their right hand should face down on top of the person’s hand on the right.
Beginning on the first beat of the first full bar, the chosen first person takes their right hand cross their body and taps the person’s hand on their left thus “passing the beat”.
This person then does the same and so on around the circle on the beat. At the end of the song the student who gets tapped on the 5th beat is out unless they pull their hand away, in which case the person who moved to tap them is out. Students can speed up during the counting.
This song is great for working on the concept of melisma or the notion of beat passing patterns.
Categories is perfect for introducing the concept of beat, incorporating body percussion and ostinato,
as well as fostering individual singing skills.
Students sit in a circle and clap the beat as a body percussion ostinato (e.g. clap, clap, click, click).
After the first line of the song is sung by the whole class, a chosen category (food, cars, countries, cities, colours etc.) is sung (usually by the teacher).
Going around the circle one at a time, students sing an item from the chosen category, improvising the names of objects in the given category. (Other categories could be types of cars, names of countries or cities, colours etc).
Practical games and activities like those above are ideal.
They support an inclusive, sequential and developmental music literacy program to make sure your students really know musical concepts and elements.
Happy gaming, everyone! – Deb
Read on for ideas for how to use First Nations songs along with links to some great activities, available via the Music Teachers’ Digital Library (note, some are free, but others are only accessible with a subscription).
Wirrumu (The Moon), is an Indigenous lullaby sung in Yolngu Matha languages (from northeast Arnhem Land) & English, written, produced and recorded by Manuel Dhurrkay & Caiti Baker.
Their stunningly beautiful recording of this was published in “The Moon, The Mouse & The Frog: Lullabies from Northern Australia” by the Australian Broadcasting Corporation in 2021.
Inanayis an Indigenous Australian song or lullaby, thought to be in Yorta Yorta, the language of one of the Aboriginal tribes of Victoria. It has also been collected from Thursday Island and the Torres Strait Islands. A direct translation is unavailable; however, it is thought to be a song about a goanna (gupuana) with the ‘choo’ being the shooing away of the goanna.
As well as being a beautiful song to sing, it is also great for unconsciously highlighting 2 metre, the do pentachord and the anacrusis, discussing asymmetrical phrasing and introducing I IV V harmony.
This First Nations song Mumma Warrunno (Maranoa Lullaby),is from Southwest Queensland. It was collected and translated by H.O. Lethbridge and an arrangement, by Arthur S Loam, for voice and piano was published by Allan & Co in 1937 in a collection of three songs called “Australian Aboriginal Songs”.
Sung through twice – the first time through with lyrics in Gungarri, from South West Queensland, and the second time in English – this simple song is perfect for sequentially preparing / presenting / practicing la, unconsciously practicing 3 metre and teaching question & answer form.
Students compose new versions of a recorded song by writing a new melody for the given rhythm using only known notes.
Clickhereto access the activity: la – Late Practice: Creative & Written
Groups of students sing allocated notes of a known song with movement.
Once the song Inanay has been learned, the ostinato pattern can be added, performed first by the teacher as the whole class sing the song, then by half the class while the other half sing.

Once students can simultaneously clap the ostinato while singing the song, they can begin adding in the following body percussion actions.

Clickhereto access the song: Inanay
Happy exploring, everyone! – Deb

One of the exciting things about music learning in general—but Kodály-inspired approaches in particular—is how integrated all of the concepts are.
In order to really know rhythm, or stand a chance of transcribing rhythms or sightreading, you need a strong foundation in a variety of time signatures.
Understanding how they work and becoming familiar with different rhythmic groupings and ‘feels’ of simple & compound time is key.
To give you a bit of a starting point, here are 10 videos that combine teaching, learning and the application of all that—theory into practice.
Try beginning with the concept of time signatures –
why we use them and what they tell us, starting with simple time.
Now we take what we’ve learned for simple time and apply it for compound time.
Now that we’ve got a few videos under our belt,
it’s time to expand–including transcriptions & tougher time signatures.
If these ten videos aren’t quite enough to cover your time signature-related needs,
remember there’s a bunch more available for free, so carve out some time to deep-dive on
the DSMusic Vimeo & YouTube channels (and make sure you subscribe to stay updated)!

Look, let’s be honest, returning to school for a new year feels a little bit like coming out of a deep festive-season-holiday hibernation. The thought of showing up on day one and having your entire music theory approach planned out for the year can be daunting.
However, what you do on day one is actually super vital for a number of reasons. You might be kicking off with a brand spanking new class or in need of a gentle way to refresh what you’ve learned and ease into the school year. What you do music theory wise can set the tone for everything that follows. Here at DSMusic, we’re all about sequential music literacy and knowing, not just learning, so with that in mind, let’s chat through getting things off to a strong start.
The best music literacy programs have a sequential approach, but that basically just means little step-by-step increments in teaching and learning. This can work either by starting from the very foundation with a concept or skill, or in reverse — seeing what ‘knowing’ looks like and working backwards. For many, the end of the line is what will be on the exam, so if that helps, use that as your compass, just make sure you take the time to prepare, present and practice music theory.
No matter what, listen. All the time. In class and out. For whatever needs to happen in those listening, analysing and responding moments, it’s a great idea to listen to as wide a variety of music as possible. Across styles, genres, instrumentation and artists. Listen for the feeling it creates, pay attention to the elements and devices that contribute to this and get into the habit early (and often!) of trying to note down what’s being heard.
For what is usually quite a noisy subject — all that singing, playing and clapping — there is a way to listen to music on the page too, without any sound. Inner hearing, or thinking sound, is frankly the only way to handle dictations and transcriptions come exam time, but more than that, it’s an internal way of seeing what you hear and hearing what you see.
Here at DSMusic, we’re big on singing and setting that up as a staple in the classroom from the get-go, but sometimes folks just feel a bit too vulnerable to show off their pipes. Using body percussion and movement can be a great way to lean into the strengths of the entire class and can be as simple as walking the beat or as challenging as a particularly intense clever echo!
Just like with the analysing we touched on earlier, which actually is there to help make us better performers, so too should music theory support what happens practically. Providing there’s some sequential scaffolding in place for the concept, you can take your lead from the lead sheet, or the notated score, or whatever’s happening repertoire wise. Analyse and sing the scales these pieces are based on, use rhythm names and Solfa to sightread new material or try inner hearing to support rote learning or memorisation.

Music classrooms are full of a mix of folks, with differing abilities, instruments (& keys!), musical tastes and assessment requirements, so why not go with the music theory option that is universal? Tonic Solfa or Moveable do Solfa is a system of note naming in which every note within a scale is given a name based on its relationship to the other notes within that key. Solfa shows us how to spell music – it’s a system for that in the same way the alphabet is for language.
It can be easy, even as early as Term 1, to start freaking out about upcoming tests, SACs and exams. When plotting things out, set up some ‘Deb deadlines’ — these pop up ahead of the actual date everything needs to be known by and act as a great progress check to help work out what still needs attention. We do dress rehearsals and mock exams for performance, why not for music theory too?
There’s a pretty huge list of ways you can teach, learn and practice certain music theory concepts, so while scribbling things down on a worksheet or watching a video or two are all well and good, don’t be scared to try something a little different. Composition is a terrific way to reinforce and consolidate understanding, and it also doubles as a means for finding authentic student voice. Why not try conducting during rhythmic dictations or singing scales in canon? This keeps things engaging in the classroom and ticks off concepts in different contexts.
Just like anything, music practice is a skill that needs deliberate work, or, funnily enough, practice. We need to play/sing on our instrument regularly, and rehearse pieces and technical work during classes, in lessons and at home — and it’s the same for music theory. Set up a schedule, or some structure for practicing and make sure this gets time during the week in the same way homework for other classes do!
Obviously everyone wants to pass and do well, and outcomes and assessments are important, but at the end of the day, the reason we’re all doing this is to become better musicians and performers, right? Or at least, the best musician we can be, which is more about building skills and capacities over time than it is getting everything note perfect!
There’s countless material on hand to structure out all your teaching, learning and knowing. The Musicianship & Aural Training Series includes 100s of worksheets, videos, listening exercises and more, while the Music Language Online Course Musicianship is a great way to deep-dive and double-down!

After all that, the key takeaways really are to be kind to yourself (this goes for teachers and students) and do future you a favour by plotting out some preliminary steps and pinpointing your go-to resources. And remember — begin listening, singing and practicing from day one!
Happy back-to-schooling! – Deb
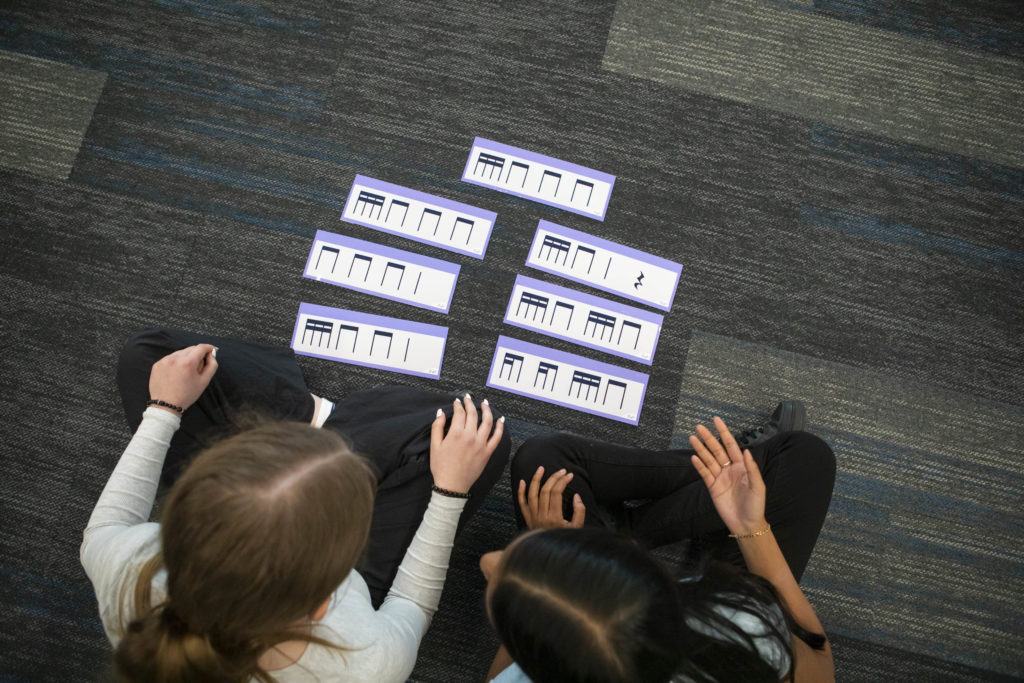
Flashcards have to be one of the most useful resources a teacher can have in their classroom!
Use them to save you having to write on the board or let the kids use them to recognise – and match the visual symbols to – what they hear. Use them to play a game with, to create with and to dictate from!
Flashcard activities can easily form a part of every music lesson, regardless of what stage of learning your class is at and are a great way to prepare for a transcription activity or any activities that use the elements targeted in the flashcards themselves.
Read on for lots of ideas for how to use Flashcards along with links to some great activities, available via the Music Teachers’ Digital Library (note, some are free, but others are only accessible with a subscription).
Click here to access Crotchets, Quavers, Crotchet Rests & Semiquavers Flashcards.
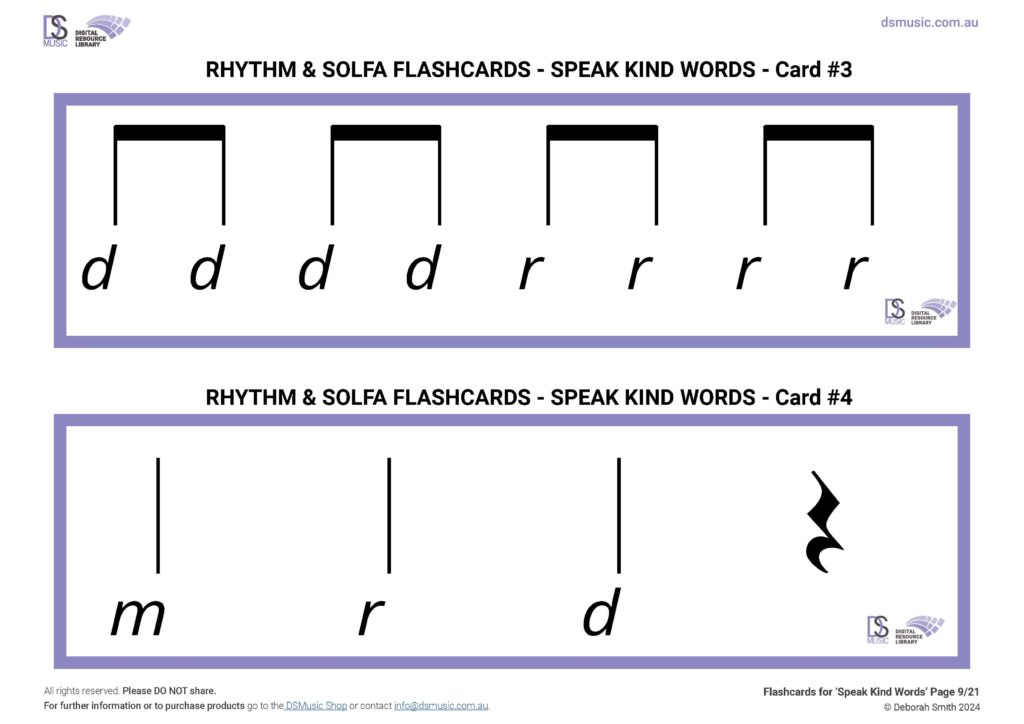
There’s a ever-growing collection of flashcard resources in the Music Teachers’ Digital Library (MTDL), so click here to view these.
There’s also an extended version of this blog post available to MTDL subscribers with a lot more suggestions, activities, links and strategies for finding the fun in flashcards!

Whether you’re looking for a way to gamify rhythm, throw in a few brain breaks or offer your classes lots of different ways to practice these musicianship concepts, flashcards are a great go-to!
Happy flashcarding, everyone! – Deb
The aim of the game here at DSMusic is sequential music literacy and really knowing. This means step-by-step teaching and learning of music aural and music theory concepts, followed by the practicing of these in a variety of ways.
Scales and key signatures (tonality) are a vital part of any music literacy approach. They pop up everywhere – whether you’re using them visually when sightreading, aurally recognising them in the senior years or memorising them to play (or write) in exams.
They’re the cornerstone of much of what we do as musicians in performance, creative pursuits and come assessment day, so it’s vital to incorporate them early and often.
Aside from using mnemonics to remember your key signatures, or hours and hours of muscle memory for reeling them off when you need to, how can we practice and really know our scales?
To give you a bit of a starting point, here are 10 videos that combine teaching, learning and the application of all that — theory into practice.
Try beginning with the concept of key signatures – why we use
them and what they tell us, before tackling finding tonalities visually and aurally.
Explore two basic scales forms – Major and natural minor – and discover
how these work and how they’re related.
Now that we’ve got a few videos under our belt, it’s time to use
sing through some different scales to build our aural awareness.
If these ten videos aren’t quite enough to cover your
scales & key signature-related needs, remember there’s a bunch
more available for free, so carve out some time to deep-dive
on the DSMusic Vimeo & YouTube channels!
Happy watching! – Deb
As part of the 2023-2027 VCE Music Study Design, music analysis or music performance analysis now incorporates four compositional devices. These, alongside the elements of music, offer students the means to identify and discuss how performer’s achieve intended effects and characters. This, in turn, supports students with their own development as musicians and performers; fostering language and an awareness of these techniques.
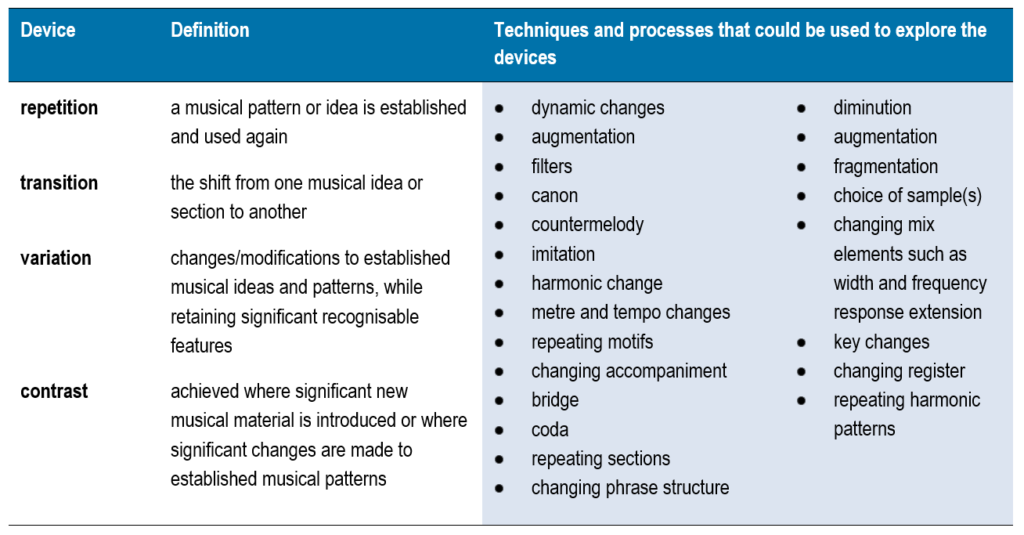
The four devices outlined by the Victorian Curriculum & Assessment Authority (VCAA) include contrast, variation, transition and repetition.
VCAA also provides ways for students to explore these within excerpts, taking something that might initially feel a little abstract and grounding it in a music analysis aural space.
It’s important to refer to the VCAA definitions for these, as they do have to relate specifically to the unifying theme of ‘musical ideas (or patterns)’. Often, too, these devices are incorporated into multi-part questions where they are either the focus, or an option for discussing how they impact on the character created.
So, let’s go through these a little more now.
As you can see above, VCAA defines contrast as “significant new musical material” or “significant changes to established patterns”.
It can be helpful then to think of this as ‘obvious’ changes within an excerpt which can often be easier to hear. This might include a change in key/tonality (e.g. major to minor), changes in tempo or dynamics (e.g. soft to very loud) or contrasting articulation techniques (e.g. staccato and then legato).
Although these more obvious elements and techniques can be simpler to detect, contrast can also be explored by considering texture, instrumentation and melodic contour. Note the specified timings below and see if you can hear this in the Bon Iver excerpt.

Or, perhaps, you could listen out for contrast in phrasing or the instrument registers being used, like with this saxophone quartet example.

As you can see above, VCAA defines variation as “changes to establish musical ideas and patterns” that very importantly, “retain significant recognisable features.”
It might be tempting to think about this very similarly to contrast (changes!) but for instance, where we might talk about contrast in relation to the use of different articulation approaches or shifts in texture overall within an excerpt, with variation we would instead discuss how the performance of a main thematic idea varies each subsequent time we hear it.
Just like with contrast, we can identify variation through elements, such as articulation and melodic contour. Note the specified timings below and see if you can hear this in the Paganini excerpt.

Or, perhaps, you could listen out for texture, instrumentation and tone colour, like with this boy wizard example.

As you can see above, VCAA defines transition as “the shift from one musical idea or section to another.”
So this device has a lot to do with transitional passages in music, connecting ideas together, like a bridge in a song. However, it can also be a little more subtle, such as a passage where modulation occurs or when the excerpt shifts through the use of a sound production transition effect like a wipe or vocal riser.
These passages can be lengthy within an excerpt, or a little shorter, and can be identified by listening for texture, rhythm and phrasing. Note the specified timings below and see if you can hear this in the Pharrell Williams excerpt.

Or, perhaps, you could listen out for transition in instrumentation, melodic contour or the instrument registers being used, like with this Koehne example.

As you can see above, VCAA defines repetition as when “a musical pattern or idea is established and used again”.
Again, sometimes we can fall into the trap of thinking about variation here, but instead of identifying how a musical pattern or idea varies through the use of say melodic contour, register or rhythm overall as an excerpt progresses, with repetition we would instead discuss exact points where established ideas appear again while retaining consistent approaches and character.
The use of repetition can create a sense of stability for the listener, however, it can also build tension. Consider register, rhythm and tone colour as you note the specified timings below, seeing if you can hear this in the Sarah Neufeld excerpt.

Or, perhaps, you could listen out for repetition in texture, phrasing or melody, like with this Hans Zimmer example.

You can find additional excerpt examples for each device to consider, as well as some sample observations for a few too. This would be a great way to work through a device type with students, and then set them ‘your turn’ examples to continue refining their skills.
If you already own Decoding Sound, then these are available within your digital resources (alongside more music analysis in-depth looks at character, elements and answering questions!). Otherwise, you can access the four FREE info sheets for each compositional device below, so long as you have a DSMusic account.

The best way to build your confidence with music analysis and compositional devices is to listen! The more excerpts you engage with, the more likely you are to be able to identify aurally what’s happening and the effect this has musically. Just like you might have a preferred element to write about (I’m a big fan of articulation and tone colour, myself!) you’ll probably find contrast a great first device with which to start.
Happy analysing! – Deb
A question I often get asked by students – especially in the lead up to exams! – is how to do dictations. Here at DSMusic, we’re big on really knowing these concepts, whether it’s scales or intervals, or chords or rhythm.
It’s important to remember that everything you’re doing in a music language space is actually to make you a better musician, not just to pass the next test! So let’s work through some ways to get better at rhythmic dictations, as well as the steps I use.
This might seem like a simple step but it’s an important one. The more you’re sightreading rhythms – trying to read them for the first time – the more you’ll be able to dictate them. Ideally, rhythms need to be read in rhythm names as this system can be carried across a variety of different groupings and time signatures. An even better extra step is adding conducting to this as well, strengthening both the reading of rhythm and your sense of pulse.
Beyond sightreading, we also need to make sure we understand what sorts of things we can expect. As in, analysing and understanding the content, format and structure of rhythms so we’re better able to recognise them. Though this is something that develops through sightreading, as mentioned above, it’s also a great opportunity to get creative. Composing rhythmic ideas takes what you’re hearing and understanding and consolidates it, enhancing your ability to recognise and recreate.

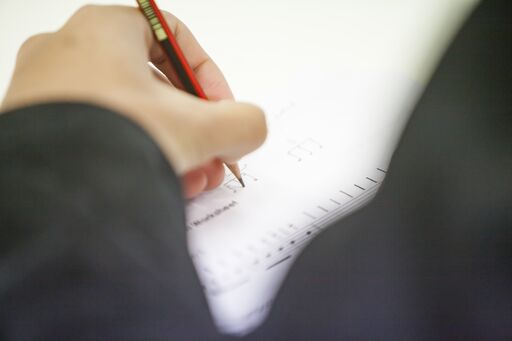
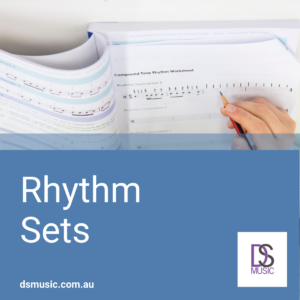
Once you know what to ‘expect’ rhythmically, this helps narrow down your options in a dictation exercise. Rhythm sets are your go-to-guide – they’re all the rhythmic groupings your ears might have to recognise. Noting them down quickly on some manuscript or blank paper before the dictation aids in the process, particularly if you can check a Study Design page for the exact rhythms that can be used. This is also very important preparation for your rhythmic shorthand – and translating how many sounds you heard into the appropriate rhythmic grouping.
Okay, so now we’ve spoken through what you should do to prepare yourself for rhythmic dictation, let’s go over the steps themselves. Remember, this is what works for me so feel free to adjust or ignore – find the approach that best suits you!
We’ve got a ready-made Rhythm Set resource for you, so just access it by clicking the image on the right and adjust as much as you need!
Are you in VCE Music? Get yours on this page!
If you’re seeking more support for this step-by-step approach, here’s some free DSMusic videos:
There’s no silver bullet when it comes to building these skills – no overnight cramming possible! You have to consistently and sequentially give time and attention to developing your awareness, understanding and confidence.
Happy rhythm-recognising, everyone! – Deb
Here at DSMusic, we understand that a lot of what we teach and learn in the music aural and theory space is connected.
While this often means we can practice several musical concepts within the same activity, it can also make step one a little daunting. Concept-wise — chords, chord progressions and cadences definitely fit into this category.
You can’t really get good at aurally identifying cadences unless you understand what they are, why they are there and how they work.
Similarly, how do you track the way harmonic patterns shift if the building blocks of chords and triads are still a little fuzzy for you?
To give you a bit of a starting point, here’s 10 videos that combine teaching, learning and the application of all that — theory into practice.
Try beginning with the concepts of triads (both Major and minor),
with a few primary chords as a focus area. Then treat yourself to a
handy overview of the main types of cadence.
Next up, let’s fine-tune that musical ear of ours by listening for,
singing and recognising the bassline in these progressions.
We’ve learned, heard and sung, so now let’s take the next step
and work out how we note down what we’re hearing, perfect
for chord progression questions on tests and learning that new
favourite song of yours by ear.
Now that we’ve got a few videos under our belt, it’s time to use
the skills we’re building and strengthen them, to make sure we
really know chords, chord progressions and cadences!
If these ten videos aren’t quite enough to cover your
chord-related needs, remember there’s a bunch more
available for free, so carve out some time to deep-dive
on the DSMusic Vimeo & YouTube channels!
Happy watching! – Deb
While we all know that becoming truly musically literate — which is the aim of the game here at DSMusic — lends itself quite well to improving our musicianship and theory skills, all that do re mi also actually applies to the practical side of things too.
That’s right! Solfa isn’t just for when you’re panicking about an upcoming aural and written exam, it’s a really great go-to for strengthening a number of practical capabilities we use as musicians and performers.
Join me as we go through some strategies for incorporating solfa in your lessons, practice sessions and rehearsals, helping link music language and literacy with music making in a meaningful and relevant way.
When supporting students in the early stages of their learning, we try to ensure they have an auditory reference for what a good sound is on their instrument. This might be a recording or another musician, or yourself as the teacher demonstrating for them. In these cases they are using the tools they have — embouchure, diaphragm support, finger placement etc. — to match what they’re hearing. Having them sing the note, sound or tone in solfa before trying to realise it practically is an immediate means for this.
Producing a good sound or tone is great for notes played sequentially in a scale, but as we’re aware, music performance requires control and precision across the spectrum. Most instruments have to face a change in register, octave, harmonics or position and, depending on the difficulty of this, students could be taking small interval steps or large leaps. As mentioned by Steenstrup et. al, 2021, using solfa to sing these can help improve pitch accuracy.
Singing and hearing the pitch you’re aiming for is one thing, certainly, but solfa is also useful for the stability and accuracy of that note once you arrive. Is your ensemble struggling to play that held chord in tune? Perhaps the climactic note at the end of a phrase is edging out of the stratosphere somewhat? No problem — get your students to pop down their instruments for a moment and use solfa to sing the chord or final note instead. It’s remarkable how so simple a strategy (and reminder!) can make a huge difference on the overall intonation of the group.
Not only is memorisation itself a great practice tool for musicianship generally, it’s also a skill fostered in the actual doing of practice. By that I mean singing scales or pieces/repertoire for music performance in solfa supports memorisation more than if you just listen to a recording or look over the notation. That’s because you’re actively engaged, and consciously aware of the actual notes when you’re singing, independently of the practical challenges that may arise while you’re still learning that tricky bar, phrase or section on your instrument.
How often in ensemble rehearsals, sectionals, lessons or practical classes, do we find ourselves working with a particular section or student while others wait? Get those students to sing their parts in solfa (using inner hearing) like you would encourage ‘shadow playing’ or ‘silent practice’. This will give them something engaging and useful to do while you’re off tuning timpani or working out what’s wrong with the bass guitar amp and it might even improve their musical expression.
When sightreading for music performance we apply all the previous strategies. Combining solfa with the act of inner hearing provides audio imagery — that is, being able to see what you hear and hear what you see. There’s often a really close connection between what we’re doing vocally and what needs to happen physiologically on our instrument, particularly if we’re playing brass or woodwind. Solfa sets the scene!
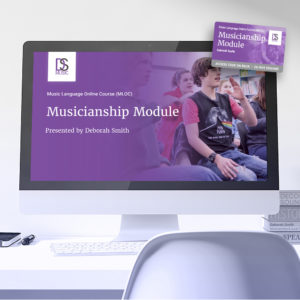
The best resource for practicing solfa and the skills we’re talking about today is the Music Language Online Course Musicianship Module. It’s got sequential activities across all concept areas and a predominantly aural focus, scaffolding inner hearing and memory too.
In a 1:1 lesson context, work through the activities (10 weeks x 7 days worth!) together, or set for home practice. Wondering how this resource might work in your rehearsal setting? Have the ensemble director use the online course access to kick-start sessions and fine-tune during sectionals with solfa, singing, clapping, conducting and more!
Even if your lesson or ensemble isn’t vocal-based (like singing lessons or choir rehearsals) doesn’t mean you can’t intentionalise vocalisation alongside music language and solfa. After all, music performance is the opportunity to take what we really know and apply it in a practical setting to express ourselves and share the magic!
Happy practicing, everyone! – Deb
Steenstrup, K., Trusbak Haumann, N., Kleber B., Camarasa C., Vuust P., Petersen B. (2021). Imagine, Sing, Play- Combined Mental, Vocal and Physical Practice Improves Musical Performance. Frontiers in Psychology Volume 12: https://doi.org/10.3389/fpsyg.2021.757052
Kageyama, N. (2023). Why Singing Could Enhance Your Daily Practice. Bulletproof Musician Blog: https://bulletproofmusician.com/singing-out-loud-embarrassing-ear-training-exercise-or-nifty-memory-hack/
When exams are looming it can be tempting to take what’s needed for test-time and build your music classes around that. Here at DSMusic though, we’re fans of fostering music literacy and as keen on finding a variety of ways to scaffold really knowing these musicianship concepts in your spaces.
You can’t always address these areas through investigation, listening exercises, theory worksheets or sightreading repertoire, so here’s a few suggestions for gamifying rhythm in your classroom.
Sit/stand in a circle with your students. Then, clap a four-beat rhythm, which the class claps back while saying rhythm names. Get the student sitting/standing on your left to clap a new four-beat rhythm and have that be what the class claps back in rhythm names. You might scaffold this a little bit for them by having rhythmic ‘options’ visible on the board or on sheets in front of them. This means they’re receiving a visual reminder of each rhythmic grouping but also acts a little like compositional training wheels when their turn arrives.
This builds on the previous game, except the student on your left adds their own four-beat rhythm to yours (eight beats in total). Then, keep moving to the left, with the next student having a go. Essentially, each student claps eight beats in total — four they heard from the previous student and four they create on the spot. The best thing about this game is that they’re fostering an understanding of rhythm, and rhythm names but also furthering their memory muscles, aural awareness and creative chops.
Just keep building, just keep building. Take what you’ve established in the previous game and add another four beats. This will mean as we move around the circle, each student claps 12 beats in total while saying rhythm names. You can make this a little easier by reducing how many new beats are required (if four feels too hard, just add one!) but there’s also a way to up the stakes even further.
The poison version of this game is exactly the same except that of the available rhythms, one is removed from circulation. If students use this rhythm, they’re out and the circle snake begins again. For those classes of yours who love a challenge (or are particularly competitive or dopamine-driven!) you can extend this by assigning a particular beat that the poison rhythm cannot be clapped on.
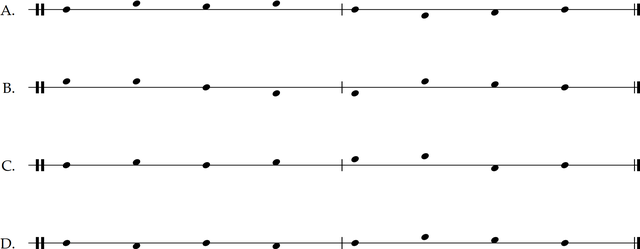
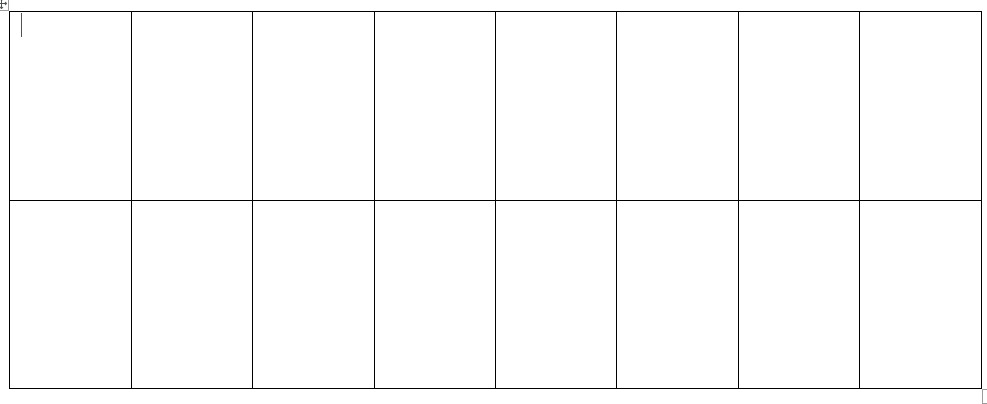
Who doesn’t love bingo? Or at least, bingo gives everyone an equal chance to win, which is always nice. It’s also another example of gamifying rhythm in your classroom and strengthening the understanding of these groupings in notated (and aural) form. Simply hand out sheets of bingo cards (see below) with rhythmic patterns on them. If you’re up for saving paper, best to laminate the bingo card sheets (class set!) and get them to mark each off with erasable markers or by placing a small token down.
Then, you (or a keen student) claps a rhythm from the master sheet that the students then clap back. If they’ve got the rhythm on their sheet they mark it off (and you should cross it off your master too!). The class claps the rhythm again, this time saying the rhythm names, while you (or that super keen student of yours) writes it up on the board. This provides a sure-fire way for the students (and you) to check there’s no dodgy bingo-ing happening. In order to win, a student must have any three groupings on their sheet across, down or diagonally, just like regular bingo.
Need to extend the game a little? No worries — just set the endgame as them having all the rhythms on their sheet.
The great news is that we’ve pre-made your Rhythm Bingo sheet, so just access it by clicking the image on the right and get laminating!
If you’re seeking more ways to gamify this in your spaces, there’s a bunch of DSMusic FREE clever echo videos available:

Whether you use these games as a brain-break activity, a way to warm-up your ensemble or as a dedicated chunk of time for this particular musicianship concept, don’t be afraid to get your students really knowing!
Happy gaming, everyone! – Deb

Here at DSMusic, we’re pretty heavily focused on the music language side of things, and the really knowing.
However, we’re also big fans of music performance analysis — understanding what other performers are doing musically to make us feel a certain way.
We really get lost listening to music and decoding the mysteries behind mood, so to help you get in the zone too, here’s some strategies for you to apply yourself.
At the heart of music performance analysis is being able to describe the character or mood of the piece you’re listening to. What expressive outcome does the piece seem to have? How do you feel when you listen to it? If you had to find some words to describe the character, mood or feeling it creates — what would they be? There’s stacks of word lists for just this sort of thing in Decoding Sound, but best of all, there’s no right or wrong answer because feeling in music is subjective.
Speaking of word lists, its a good idea to start gathering a bunch as a go-to. Angry words, sad words, exciting words and everything in between. Its best if these words are comfortable for you to use because even if what you feel can’t be wrong, you still have to be able to describe and justify it in your answers. Have a go now — see how many words you can come up with to describe the character of this song.
Although in exam or testing situations you’ve got a limited number of listens (and time in between to scribble frantically!), while you’re finding your analysis feet, take as long as you need. My trick is to listen at least once without really focusing too much on anything, as this helps me find what mood or feeling resonates. Then, on each listen after that, I’ll pick one element or aspect to focus on. If you can though, best to make your multiple listen tracks the sort of music that won’t annoy you too much the tenth time it’s reverberating through your headphones!
Here at DSMusic, we’re big on sequential skill-building, so like I said in the last tip, work on one thing at a time. Typically, (not always!) elements like articulation, texture and tone colour are a great place to start. These focus on the way the performers begin and end their notes, the overall balance, blend and layering of instruments involved and the style or character for the sounds being created. What sort of words would you use to describe the articulation featured in this piece?
Listening to music for analysis is different to blocking out the world with your favourite jams. It can be tempting to pop on your go-to tunes all the time, and while these might not be a bad place to start your journey, we encourage you to play around with your playlists. Sure, you mightn’t particularly enjoy every piece you listen to, but remember, your opinion about whether it’s good or not isn’t actually the point. Broaden your musical horizons!

The reason we engage with music performance analysis in the first place is to hear how performers manipulate the expressive elements of music (like articulation and tempo and all the rest) to get us feeling a certain way — so we can do the same! Why not swap the headphones for your instrument/voice every once and a while and see if you can apply some of these same strategies and create your intended character?
Once we get used to listening for specific things, the next step is being able to articulate that on paper, which can be tough. I advise you try and find a process that works for you — dot points, sentences and paragraphs, tables, whatever. Routinely note down what you hear in the way that works for you because like anything, you get better at it the more you practice!
One way to help build your world lists but also double-check you can argue well for what you’re hearing and chatting about feeling-wise is to bounce off someone else. Pair up (or organise an analysis squad!) with a fellow listen & interpreter and compare notes. Often two people can hear very different things in the same piece of music so its a great way to expand your own understanding.
You mightn’t think you need to practice music performance analysis in the same way you do your scales, songs or that stuff for rehearsal, but actually, you do. Set up a schedule, or some structure for listening and interpreting regularly and make sure this gets time during the week in the same way instrument/voice practice (hopefully!) does.
This is the last tip because it’s very important – while there’s a great deal of subjectivity with music performance analysis, there’s also some key focus areas. If you’re studying VCE Music, VCAA has a list of compositional devices (like contrast and repetition) and elements/techniques for exploring these (that’s where tone colour and the rest fit) and DSMusic has some freebies to help. Just like your word lists, you need to build a level of familiarity and comfort with these so your ears get really good at noticing them in your listening excerpts!
Your first stop should always be Decoding Sound — it’s the definitive textbook for teaching, learning and really knowing music performance analysis.
There’s also a wealth of FREE listening examples and sample observations that focus on particular compositional devices for VCE Music, which you can access at the bottom of this page.

After all that, the key takeaways really are to listen to as much as you can, all the time, across different genres, styles, instruments and more. Jot down words, thoughts and feelings as you go so when the time comes, music performance analysis is as easy as do-re-mi.
Happy analysing! – Deb
When I set out to design the DSMusic material, I knew I wanted to create a program that would teach my students to become truly musically literate – to be able to ‘read’ and ‘speak’ music like we do other languages. That is, when we see words written we understand their meaning and we know how they would sound if they were spoken. When we hear words spoken, we again understand their meaning, and we know how they would look when written down.
This approach is based on the belief that good quality music education is for EVERYONE, regardless of background, learning style, ability OR prior learning. It is singing-based, which means there’s no expensive equipment required, no technical or practical difficulties involved in playing instruments and it helps students develop the most direct relationship with music possible.
Let’s chat through some of the other ways this immediacy of singing, a key cornerstone of the Kodály approach, supports what we’re doing in our teaching and learning spaces.
It’s about more than just removing barriers to taking part. Singing also enables the chance to learn and internalise what we’re doing musically. We talk a lot about inner hearing here at DSMusic and singing is step one. Along with inner hearing, singing builds skills in memory and intonation, as well as being a great way to check the accuracy of how rhythm and melody are being internalised.
Singing is a super social way to make music! It’s such a joyful and spirit-feeding activity that can help to build social harmony everywhere from classrooms to community choirs. There’s just something special that happens when a group of people come together and sing-–anyone remember the balcony choruses of Italy during lockdowns? One of the things I enjoy most about teaching music is the beauty of a well sung canon by a cohort of students. Beyond this, the singing of Kodály inspired repertoire and the held songs of a variety of cultures, expands our musical worldview.
Something else that’s key to the teaching of music literacy is the notion that you are ‘experiencing first and internalising second.‘ We do this essentially by incorporating elements of play, absorbing skills and understanding through a variety of interactive exercises designed to move sequentially and incrementally. This experiencing happens instantaneously using sight-singing and sightreading, building the syllables and sentences of music language.
We’ve mentioned already how direct singing is for learning, as well as the fact that there’s no expense like there would be with instruments, but a key element of the Kodály philosophy is this universal right. Every child can learn how to express themselves musically through singing. This helps them literally find their voice, on a fundamental level, which is vital for everything else that follows.
If you’re looking for more about singing, or how that informs what happens in Kodály inspired practice, check out these videos:
If you’re seeking opportunities to get singing in your spaces, there’s a bunch of DSMusic songs, canons and games available:
What we’re doing in these spaces is more about using singing to help us teach, learn and make music, as opposed to creating a bunch of professional singers. Sometimes we can feel subconscious about how we sound, or feel that we’re ‘instrumentalists and not singers’, but as the Kodály inspired approach tells us; we’re actually both!
Happy singing, everyone! – Deb

We know preparing, practicing and really knowing music aural & theory can be a bit challenging because we don’t really know where to start. To support all the great music-making happening around us, we’ve put together a top 10 list to point you in the right direction.
Check out some resources and content you might have missed around the DSMusic space recently.
How do you manage learning new notated material?
Sightreading is an ongoing skill that needs attention and intention in music, so why not join me for a quick look at a Major Melody in letter names?
How many times do we just throw that pesky “p” word around? Practice, just like everything else we do musically, is a skill that needs deliberate focus and attention, so we’ve popped a list of ideas in this blog article for you!
In this FREE practice resource, students are shown a variety of Rhythmic Clever Echo activities designed to foster their ongoing music aural and rhythmic recognition skills.

Gideon, a professional drum tutor based in London, teaches mindfulness-based stress reduction programs. Music and mindfulness definitely intersect, so have a read of his article and see what you think.

Some terrific perspective from a musical legend. How has music taught you to keep trying no matter what?

This article outlines some practical steps to aid in the process of sightreading. We suggest for step 3: inner hear the rhythm names while tapping the beat, then before step 5: sing the solfa and for step 5: SING the letter names!
A Few of my Favourite ….. Interval Activities
I was recently struck by how many activities we need to keep our students interested and engaged in our music classes.
If we teach something to our 4 year old students (e.g. “beat”) then we need to have sufficient practice activities to challenge our students enough to keep them practicing “beat” for as long as we continue to teach them – in some cases up to Year 12.
So I’ve decided to share some of my favourite activities (suitable for all levels – just adjust the content to suit) which I hope you will find useful.
This blogpost deals with Interval activities. Keep a look out for my next “A Few of my Favourite…..”
Bingo
You as the teachers – hands out laminated bingo cards (like the ones on the image above) with 9 interval names on it. (If fewer interval names are known then intervals can be repeated on the card). You also hand out a whiteboard marker or 9 tokens to each student.
You sing an interval (on a neutral syllable) from the master sheet (which is then crossed off).
Students sing it back (on a neutral syllable).
Then, students mark (with whiteboard marker or playing token) the interval off if on their sheet.
The class sings the interval again in solfa as you or a student writes on the board to check.
To win BINGO, your student must have any three across, down, or diagonally or for the longer version – all the rhythms – like regular BINGO.
Flashcard Knockout (Musical Chairs)
Requirements: Interval flashcards – one per student. There can be more than one card with the same interval name. Click on the image below for free printable interval flashcards.
You, as the teachers, puts one flashcard per number of students with the names of known intervals on the floor. 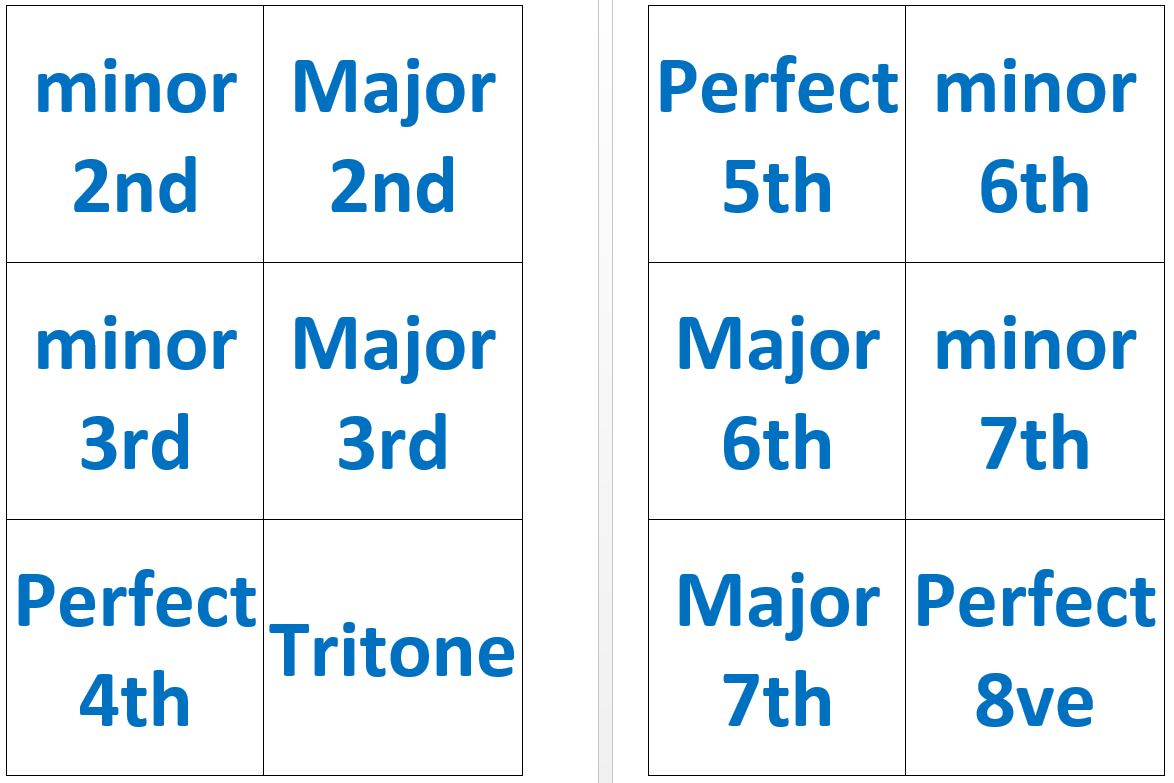
Students walk around as you play some music (I use this chance to play the work we are studying in the “Listening” part of the course).
When the music stops students stand on a flashcard.
You then sing or play an interval from one of the flashcards. If a student is standing on the flashcard with the interval sung or played they sit down. If they are correct they stand to continue the game. If they are wrong then they are “out”.
Interval knockout.
Your students stand with their eyes closed.
You then sing a known interval on a neutral syllable.
For example, if you sing a Major 2nd, students would hold up two fingers. They would hold three fingers pointing down for a minor 3rd and three fingers pointing up for a Major 3rd and so on.
To correct, the class sings the interval on the neutral syllable and then labels it i.e. “Maj-or 3rd”.
Your students who show the correct interval remain standing, those with the incorrect interval sit down.
Interval Lines
Read this interval line from the board by beginning on the given solfa note then singing the note suggested by interval quality and arrow.

If sung correctly an interval line will end on the starting note.
Here is the above interval line written out on the staff:
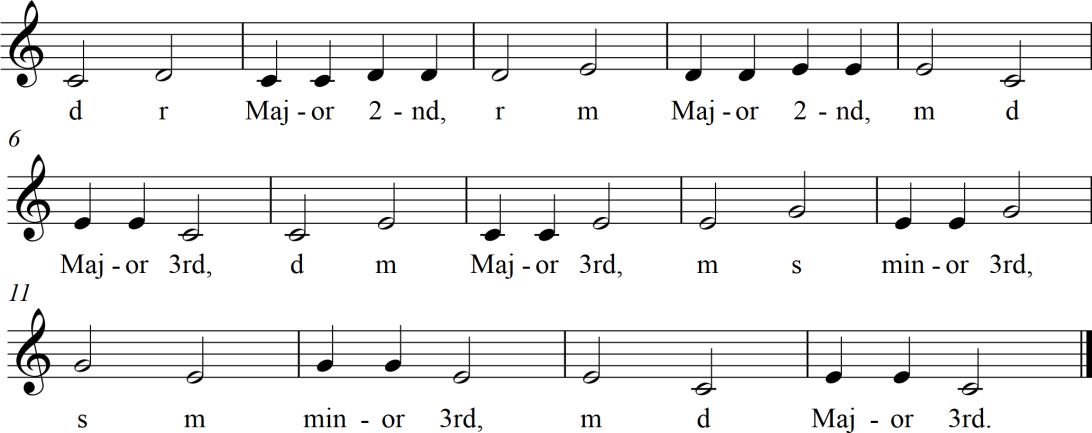
Asking students to create their own interval lines is a great way to ensure they understand the intervals that can be found in a particular scale.
How do you practice intervals with your classes?
Here at DSMusic, we’re big on all things music language, and building music literacy using Kodály-inspired strategies.
We know that while the fundamentals of what we’re teaching and learning in these spaces hasn’t changed too much, what we’re required to do come exam time often gets tweaked. This is the case for us in Victoria at the moment, where we’re getting stuck into a new VCE Music Study Design.
Sometimes though, these changes can make preparing, practicing and really knowing a bit challenging because we don’t really know where to start. To support all the great music-making happening around us, we’ve put together a top 10 list to point you in the right direction.
Mapping melodic contours are the feature of this blog post, but these videos below provide a means for taking that a step further.
Learn about the melodic transcription process and get these capacities happening aurally via a clever echo activity.
Sort your tones from your semitones, your skips from your steps and your mi from your fa!
Learn about what goes into intervals, how to identify them and practice singing some of them through.
There’s much more to go through (including a Key Signature Sheet freebie!) in this blog post,
but a tour through the three videos below are a great place to start when trying to suss all things scales.
If you’re after specific scales, DSMusic has videos for these so check out the Vimeo & YouTube channels.
When it comes to unpacking triads, chords, progressions and cadences,
DSMusic has everything you need! Start with the building blocks below.
There is a veritable goldmine of video resources available, across all concepts and points of teaching and learning, so I encourage you to fall down the rabbit hole on the DSMusic Vimeo & YouTube channels!
Happy watching! – Deb
To give you a starting point we’ve popped together 3 FREE activities for mapping melodic contour in your classroom. Plus, while you’re at it, find out what melody and melodic contour has to do with creating musical character and mood!
Check out some resources and content you might have missed around the DSMusic space recently.
This FREE DSMusic kahoot quiz uses MAAT Level 1, Lesson 3 Video: Metre.
Learn a little bit about metre before tackling the topic of time signatures.
Ever heard those stories about Beethoven being deaf but still able to crank out some classical magic?
Find out his secret (and the key to unlock its magic for yourself) — inner hearing
Wondering how balance, blend and texture can take it’s toll on overall mood?
Join me (and Billie!) for a brief look at how the way things sound independently and together can impact the way a piece of music makes us feel.
What are your favourite Kodaly-inspired resources or teaching elements?

This opinion piece from the US highlights the ways in which COVID helped school communities recognise how important and vital music education is for student wellbeing.

Ever wondered why the Star Wars main theme makes you feel ready to run off and join the Rebel Alliance and take on the entire Empire? Sure, that fanfare has some pretty epic blasting brass which has something to do with it, but there’s another reason. The answer? Melodic contour.
Not sure what that is? Essentially, it’s the shape and direction pitches in music take to form a melody. These contour patterns can rise up, descend down, or continue at the same pitch. So, in the case of this Star Wars theme, the contour (shape) rises and falls but is constantly searching upwards. Aspiring to greater heights and power, if you will. In this way, melodic contour is a very powerful tool in creating a certain character in music.
Let’s leave the sci-fi references there for now and talk through some simple ways to slot this into your classroom.
Melodic contour impacts the way music can make us feel, certainly, but we can also look at what it means structurally for melody, and as a form of graphic notation.
The activity suggestions that follow have been organised by Level 1-3, as with the DSMusic Musicianship & Aural Training series, but they’re adaptable for the needs of your spaces and students.
In this activity, the focus is on learning that there are other, less common ways to notate music than using a traditional Western staff and that all music does not have to involve traditional musical instruments.

2. For each sound they come up with a graphic representation. An example of this is that for the siren you could draw a picture (see top left).
3. Using a grid or table (see bottom left) with an agreed number of “notes” they compose their piece by putting a symbol representing the sound in each box. Any empty boxes are rests or silences.
The class could then perform each and record their performances.
In this activity, the focus is on building an understanding of how graphic notation is used to demonstrate melodic contour.
1. Students watch videos that feature a graphic representation of melodic contour. Here are a few suggestions:
2. Students discuss, in groups, the way graphic notation for pitch matches what they are hearing. They then workshop their own graphic notation to show pitch, including high/low or long/short.
For this activity, students should be encouraged to select their own pieces of music to listen to and map with graphic notation, using a similar grid or table as used in the Level 1 example.
For more activities of this kind, some great activities can be found here in the relevant section of the NSW curriculum.
In this activity, the focus is on using an altered staff form of graphic notation to indicate melodic contour heard aurally, as it is closely related to the traditional Western 5-line stave.


A possible extension for this activity is putting students into pairs and having them flip these steps. Essentially, have them compose a simple melody on the traditional staff, then transfer this a one line staff melodic contour representation. Then, they perform their melody for another pair of students, who notate it on the single staff, checking to see how closely it matches.
The activities above show ways to use melodic contouring for listening and creative exercises. Another way to address this concept in your classes is when examining melody more broadly. Understanding that the contour is a pattern that forms the basic structure of a recognisable melody, allows us to expand that notion further.
Take our opening recognisable melody—this could be taken in it’s melodic contour form and transposed into a different key while still retaining that famous lightsaber-weilding heroism.
This is a little bit like the way DSMusic uses tonic (or moveable do Solfa) when teaching, learning and really knowing scale patterns and tackling tonality. Its just that in this case, in place of the melodic contour graphic notation, we use physical handsigns to represent pitch movements.
You can find much more about melody throughout all DSMusic resources, particularly in the Musicianship & Aural Training Series Level 1-3 and the Music Language Online Course. MLOCM gives you a bunch of ready-made melodic patterns to use!
If you set contour as your starting point, you can then expand this to consider melodies in different tonalities, as well as composition and creative tasks.
While you’re keen on checking out contour, here’s a few places to start:
Whether you’re listening, identifying or using it a means to create, there are a variety of ways we can focus on melodic contour in our teaching and learning spaces. Melodic contour is your way to take some first steps into a much larger melodic world.
Happy melodic-contouring! – Deb
What lies at the heart of tackling tonality? That’s right—it’s key signatures.
Join Deb as she unpacks a FREE resource that brings together everything you need where key signatures, transposition and tonality are concerned.
Check out some resources and content you might have missed around the DSMusic space recently.
This free video tutorial provides an overview of beat. Students learn to differentiate between beat and rhythm.
This suits all students as a great introduction to key fundamentals of music.
How many times do we just throw that pesky “p” word around? Practice, just like everything else we do musically, is a skill that needs deliberate focus and attention, so we’ve popped a list of ideas in this blog article for you!
Seeking ways to solidify semiquavers and sight reading rhythms in Simple Time?
Join Deb for a snappy practice activity that’ll get you clapping, tapping, clicking & conducting!
Fascinating! So many links between music and other disciplines/aspects of self!
We agree! When have you witnessed such a spark in your context? Where did your passion for music come from?
In this article, further discussion of the neurological benefits of music takes place, building on a fascinating MIT study.
Anytime we’re approaching questions or activities built around the concept of tonality or key signatures, there’s a great deal of assumed knowledge we’re trying to tap into. As with much of our musicianship elements, everything is interconnected.
We can’t teach and learn and really know tonality until we have an understanding of scales and key signatures. From there, we’re better able to identify, write, sightread in and transpose to and from a range of tonalities. How can we dive into relative keys, or what sets different scales apart without first understanding what those sharps and flats plonked right at the beginning of your music mean?
Join me now as we journey together through the circle of fifths, those ‘Father Charles Goes’ rhymes and realise why scales and their signatures are key to tonality.
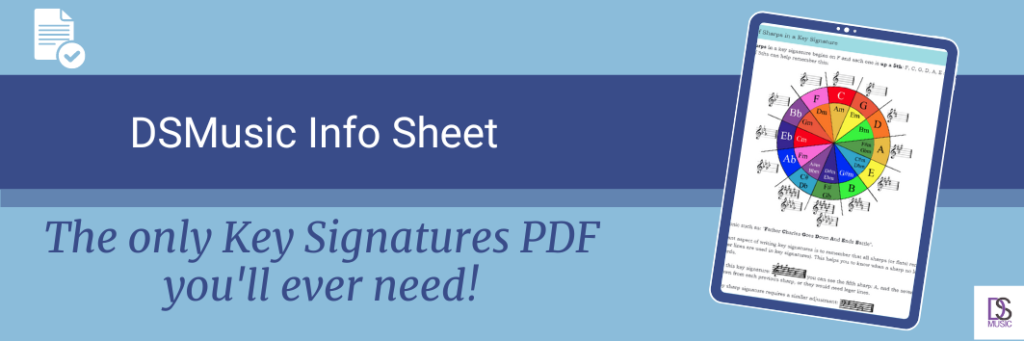
In this FREE worksheet, we cover the theory and process behind transposing the Major Scale and suss what key signatures actually are. We go through those sharps and flats at the beginning of your music which belong to specific keys and must visually appear on the staff in a certain order. Lastly, we walk step-by-step through the process for finding key signatures, which is fundamental for all music aural & theory that follows.
Starting with transposition on the first page of this worksheet gives us the tools we need to move further. Here, we chat through the structure of the scales that relate to key and tonality. For the Major Scale, which we use as an example, we know the interval patterns that should appear, regardless of whether you start on C or G. By highlighting where the semitones fall using slurs, we’re building a sense of how we can take this tone-semitone sequence and transpose it into other keys.
Identifying the patterns we know we need gives us other information, too. In order to make sure the tone-semitone sequence lines up in each key, we need to make intervals larger or smaller. We do this by applying a sharp or flat, but how do we make sure these are retained through that key on the rest of the music? This is where key signatures (and also accidentals) come in and now we understand their purpose.
And on page 3 of this resource, we’ve popped all the MAJOR key signatures together for you, appearing on both the treble and bass clefs. This is a really useful way to check what key the music you’re teaching, learning and listening to is actually in.
While visual listing of the scales/keys are important, the circle of fifths diagrams on the remaining pages of this worksheet give us much more information. We start with the MAJOR keys in this resource and then progress through to a preliminary look at how these relate to other keys as well. The circle of fifths shows us what goes into each of those keys (how many sharps and flats), the order in which these keys cycle through and which minor key they are related to.
This knowledge is fundamental whether you’re working through some theory sheets in a music classroom or jamming with mates!
As the circle of fifths can be visually very clear but difficult to remember when you’re trying to work out key signatures in the moment, we use mnemonic rhymes to help us:
Father Charles Goes Down And Ends Battle (for the order of sharps)
Battle Ends And Down Goes Charles’ Father (for the order of flats)
One of the great things about finding your way through this concept is that there are a few methods you can choose to help you. This means you’re more likely to settle on an approach that suits your needs as a musician, but it also gives us different ways to teach the how-to. Here at DSMusic we’re all about Solfa, so we love the “where sharps you see the last is ti” and “when flats there are the last is fa”. Work through the three versions of this process and see whether you agree!
The language of music acts as a sequential path of literacy, where each stage builds on the last, driven by capacity, skill and true knowledge. Scales, key and tonality are your first steps!
Aside from the free worksheet above, there’s plenty of free videos available on the DSMusic Vimeo and YouTube channels.
Check out some of the selected options below, or else, just type in ‘scale’, ‘transposition’ or ‘key’ and fall down the rabbit hole!
Even if you’re not always working from notated scores or needing to visually identify keys for exam purposes, musicians who collaborate, arrange, compose and perform can use tonality and key as a basis on which to build something amazing!
Happy tonality-tackling! – Deb
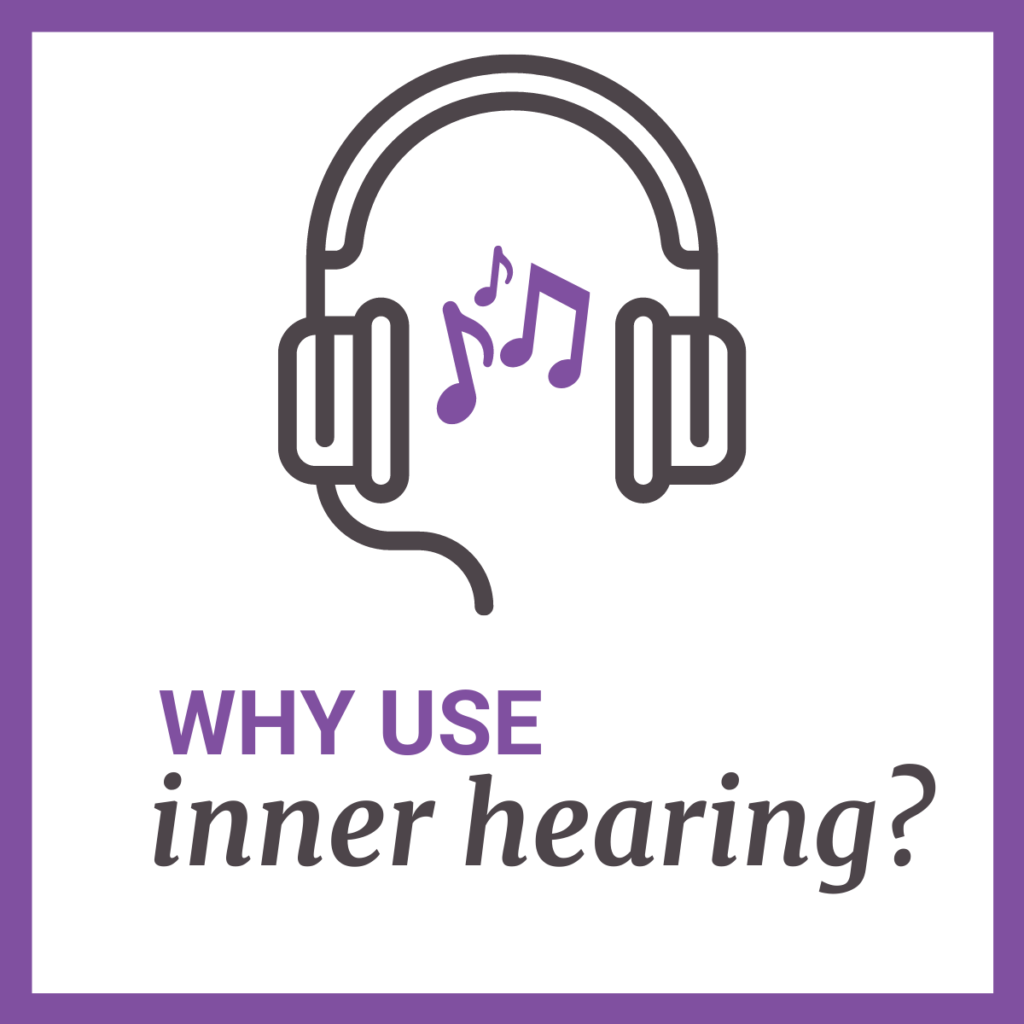
As musicians we should aim to be able to read music just as easily as we read a book. When we read books, we hear the words in our mind rather than speaking them aloud. Just as we can hear the written word in our heads, it is important to learn how to hear written music in our heads.
Inner hearing (or audiation) is the process of thinking sound rather than externally making sound. It is an essential skill when trying to produce a quality musical sound.
In other words, inner hearing is the ability to “see what you hear” (i.e. be able to imagine music you hear written on the staff) as well as “hear what you see” (i.e. be able to “inner hear” the music you see written on a staff). Learn more about this key approach to the language of music here.
Inner hearing is the process of thinking sound rather than externally making sound. It is difficult for a musician to produce a quality musical sound without first thinking that sound. This skill is demanded in aural tests requiring that all ‘workings out’ are completed in a student’s inner hearing (for example, you cannot hum or sing out loud during a VCE Aural and Written Exam!)
How does a student KNOW if they are playing in tune? Especially if no one else is playing the same notes with them at the same time? How does a composer/song writer know how music they are creating will sound if they do not have a fancy music software program, instrument or the ensemble or group they are composing for with them at all times?
By the time Beethoven wrote his 9th Symphony he was completely deaf – so how did he know what he was writing would sound like? His secret was inner hearing!
Type 1: Listening to familiar or unfamiliar music
Type 2: Reading familiar or unfamiliar music
Type 3: Writing familiar or unfamiliar music from dictation
Type 4: Recalling and performing familiar music from memory
Type 5: Recalling and writing familiar music from memory
Type 6: Creating and improvising unfamiliar music while performing or in silence
Type 7: Creating and improvising unfamiliar music while reading
Type 8: Creating and improvising unfamiliar music while writing
Audiation works in six stages:
Stage 1: Momentary retention (memory) – of what we’re hearing
Stage 2: Initiating and audiating – we’re hearing tonal and rhythmic patterns, elements that will help us to the next stage…
Stage 3: Establishing objective or subjective tonality and metre – based on what we audiated, we’re able to apply our knowledge
Stage 4: Consciously retaining in audiation – remembering and also collecting and storing away those tonal patterns and rhythm patterns in our memory
Stage 5: Consciously recalling patterns – retrieving these patterns when we see them again in other musical pieces and contexts
Stage 6: Conscious prediction of patterns – because we’re thinking in the language of music, as well as retaining patterns over time, we’re able to make logical leaps about what might come next musically
The Rhythm Names and Solfa syllables you’re using are vital to increasing your inner hearing or audiation skills because ultimately, they help you understand what you’re hearing and the function of those elements in context.
Audiation is a term created by Edwin Gordon, a fusion of “aud” (sound) and “ideate” (to think). It sits within Gordon’s broader music learning theory.
Audiation is the understanding and internalisation of music (or sound) when it is not otherwise present. Audiation – inner hearing – is different to the concepts of aural perception or aural imagery, which is normally related to notation. Audiation was a means to describe the phenomenon of learning language as it applies to the syntax of understanding music.
You can find more information here.
Happy inner hearing! – Deb
Check out some resources and content you might have missed around the DSMusic space recently.
DSMusic’s top tips for practicing musicianship!
Needing to “practice” is quite a catch-cry in the music learning space but sometimes it can be a little harder to model what that might look like for our students, as far as aural and theory practice is concerned.
DSMusic content and resources has ways to practice skills and concepts woven deliberately throughout, so that we’re building incremental understanding and musicianship muscle memory — practicing how to practice!
In this traditional folksong, students are given the chance to practice high do’ within the major pentatonic scale.
With simple rhythms and a comfortable singing range, this one will get you tweeting.
Tackling ti-ka ti-ka with your students? The name says it all!
This canon is a great way to practice semiquavers and how they differ from the rhythmic values around them.
In this free Level 3 Video, Deb gives students an overview of the intervals in a Major Triad with opportunities to consolidate their understanding visually and aurally.
Check out these 10 tips to help you practise more effectively. These are practical things you can incorporate immediately into your routine.

Sometimes music says it better than our words can. What are some of the most impactful pieces of music you have heard?

A legacy that lives on!
What ways is music an integral part of school identity in your context? Let us know!