
Archive
-
3 rhythm-based instrumental activities for your rehearsals
Comments Off on 3 rhythm-based instrumental activities for your rehearsalsRead on for ideas for how to use these rhythm-based activities in lessons, rehearsals or practical classes on instruments. These activities are adapted from singing-based versions available via the Music Teachers’ Digital Library (note, only accessible with a subscription).
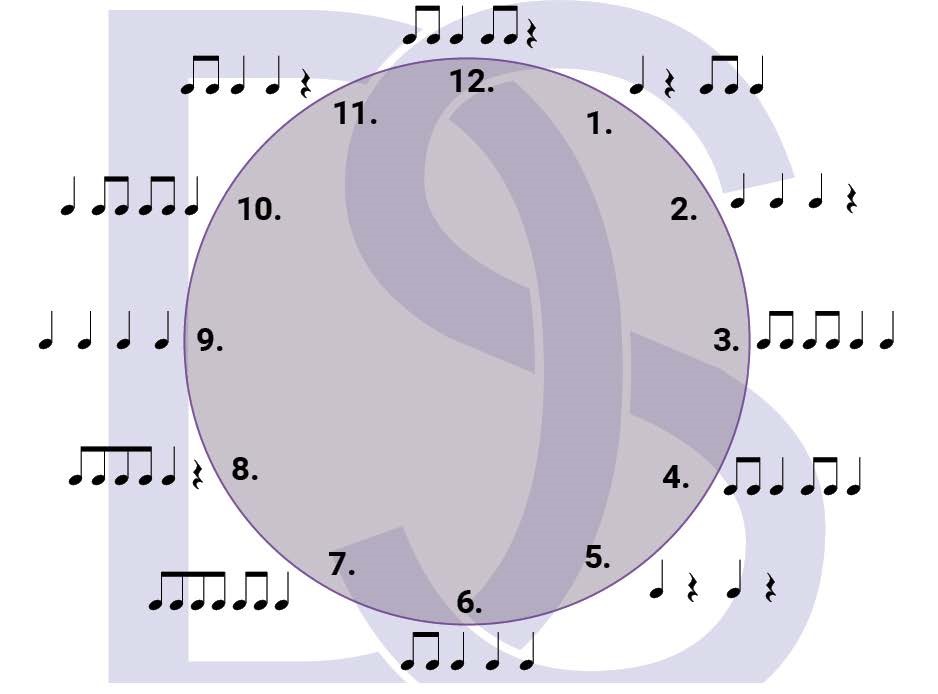
Rhythmic Practice Activity: Rhythm Clock
In this activity, students perform rhythmic patterns according to the time on a rhythm clock.
Step 1. The teacher displays this Rhythm Clock 1 for students to see (using computer connection, digital projector or similar).
Step 2. Students keep the beat by tapping their feet and perform the rhythms they see by playing all four beat rhythms (on a single repeated note) beginning at 1 o’clock, moving clockwise around the clock.
Step 3. Repeat Step 2., in reverse.
Note: For instrumental lessons rhythms could be performed on instruments on a single note or using the notes in a scale being practiced.
Rhythmic Practice Activity: Clever Echo Canon
In this activity, students perform an immediate clever echo (without clapping and aurally deriving the rhythm first) as a canon.
- Step 1. The teacher claps a continuous rhythm using known rhythms and moving in groups of two beats. (This can be done with any number of beats as students become more adept at this activity).
- Step 2. After the first two beats the students play back (on a repeated note) the first two beats the teacher clapped. This is done as the teacher claps the next two beats of rhythm, creating a canon effect.
Rhythmic Practice Activity: Ostinato Composition
In this activity, students compose a four beat rhythmic ostinato to accompany known songs.
Step 1. The teacher sings a known song, rehearsal work or melody while keeping a steady beat, on a neutral syllable e.g. “doo”.
Step 2. The class identifies it while performing the beat (e.g. on their feet) and clapping the rhythm.
- Step 3. On the board are four empty beat circles. The teacher chooses students to come write either a Crotchet, Quavers or Crotchet Rest in each beat circle. This rhythm forms an ostinato – a musical pattern that is repeated over and over.
- Step 4. The students then clap this ostinato through twice before half the group play the song, work or melody as normal, while the other half continue clapping the ostinato.
- Step 5. Other students take turns at creating beats or whole ostinati to perform with the song, work or melody.
This activity can lead to some good discussion around composing e.g. discuss whether each ostinato is easy/hard/logical etc. to pair with the work and why.
Note: In ensemble classes the ostinato could be performed by a group of students while others play a known song.
Let the Music Teacher’s Digital Library (MTDL) offer you many more rhythm-based practice activities!
Happy practicing, everyone! – Deb
-
Why Kodály-inspired teaching is vital for sequential music learning
Comments Off on Why Kodály-inspired teaching is vital for sequential music learningWhen teaching sequential music learning, long term strategic planning is essential.
The first step is deciding what should be included in your curriculum, then, determining the sequence in which these should be taught and when.
Once the overall sequence has been determined, a teaching strategy is developed for each element or concept based on the Three Ps: Prepare, Present and Practice, ensuring step-by-step learning for students.

Three P’s: Prepare
Preparation is the most detailed section of a strategy and is divided into Aural Preparation and Visual Preparation steps.
For example, the Preparation steps for a Rhythmic Strategy, should include the following steps in order:
1. Learn repertoire (only includes known elements plus the new element).
Aural Preparation:
2. Sing this repertoire while performing the rhythm, hearing the beat and rhythm simultaneously and performing the beat and rhythm simultaneously
3. Aurally discover that there is a new rhythmic element
4. Aurally discover where the new rhythmic element is
5. Aurally discover everything new about the new rhythmic elementVisual Preparation:
6. Learn what the new rhythmic element looks like.
Keen on exploring this more for melodic elements? Click here.
Three P’s: Present & Practice
After preparation is Present / Make Conscious, the shortest and least crucial step of the Three P’s, simply where the new element is named and linked together with its sound & symbol.
Last in the sequence is the Practice segment of a teaching Strategy, which includes a list of at least 12 activities designed to practice, internalise and consolidate the knowledge acquired in the Prepare and Present steps.
The 12 activities should include at least four activities for each Practice Stage: Early, Mid and Late in order of level of difficulty, with approximately three of each Practice Type: Aural, Visual, Written and Creative activities, although there’s much more available in the practice space in the Music Teacher’s Digital Library (MTDL!)
Teaching Strategy: Sequential Teaching
& Learning Time-Savers!In Kodály-inspired teaching, we use terms like strategy outline, teaching strategy (mentioned above) and teaching focus across our curriculum and planning material.
What do we mean by ‘teaching strategy?’
A Teaching Strategy is the detailed plan for teaching a musical concept/element.
It includes step-by-step directions for the teacher and sometimes the actual wording or script that contains the questions and specific directions for students.
Teaching Strategy Outlines
In the outline itself then, the teaching strategy is shown through three main areas.
Objectives/Outcomes/Learning Intentions, which acts as a short summary of what the students will be able to do by the completion of the strategy.
Prerequisite skills/knowledge, or a list all the rhythmic and melodic skills and knowledge that the students already understand.
Plus a Song List for Teaching, containing only the element to be taught and elements already known.
Following these three sections, each teaching strategy carefully sequences Prepare (Discovery), Present (Naming) and ongoing Practice of a concept.
Teaching Focus: Lessons for Sequential Learning
This sort of teaching focus layout is educator directed and well-planned to capture student attention and interest and to ensure true learning and understanding occurs.
When done well, a teaching focus is taking what students know (review), quickly guiding them to the new information (point), and then immediately consolidating that (reinforce) before moving on.
We can see here that students aren’t reviewing everything they know about an element, just what is relevant to the Point section itself. That’s the shortest part of the teaching focus sequence, before ‘Reinforce‘, in order to ensure the new information has been understood.
And remember…
This is just some of the planning and support information and material that exists in the Music Teacher’s Digital Library (MTDL) for you to teach in this Kodály-inspired way to get your students really knowing!
Happy sequential teaching & learning, everyone! – Deb
-
Analysis Series: Character, Mood & Word Lists
Comments Off on Analysis Series: Character, Mood & Word ListsAs a language, music can speak to us on many levels. For example, emotionally, a piece of music may make us feel uplifted and joyous, and physically, this same piece of music may leave us feeling energised and motivated. We may recognise and understand a composer’s use of form, or be able to hear and appreciate a chord progression.
The practice of being able to decode the sounds we hear is called analysis. The tools of analysis enable us to study or examine music in detail, in order to understand, explain and interpret it.
Essentially, we’re listening to music for what sets it apart, identifying aspects, elements and approaches we can use to elevate our own performances and become better musicians.
So, let’s make a start together.
Feeling & Describing
At the heart of music performance analysis is being able to describe the character or mood of the piece you’re listening to. What expressive outcome does the piece seem to have? How do you feel when you listen to it?
If you had to find some words to describe the character, mood or feeling it creates — what would they be? There’s stacks of word lists for just this sort of thing in Decoding Sound, but best of all, there’s no right or wrong answer because feeling in music is subjective.
Speaking of word lists, its a good idea to start gathering a bunch as a go-to. Angry words, sad words, exciting words and everything in between. Its best if these words are comfortable for you to use because even if what you feel can’t be wrong, you still have to be able to describe and justify it in your answers.
Cataloguing Character
Work: ‘Apollo’
Composers/Creators: Hugo Gruzman & James Lyell
Performers: Flight Facilities, Katie Noonan & the Melbourne Symphony Orchestra
Album: Live With the Melbourne Symphony Orchestra (Future Classic, 2015)Listen to this excerpt and describe the character or mood of this performance. Does the same character stay throughout the excerpt, or does it change? Remember, there’s no wrong answer, just have a go describing the character with two or three words.
Lots of Listening
Listening to music for analysis is different to blocking out the world with your favourite jams. It can be tempting to pop on your go-to tunes all the time, and while these might not be a bad place to start your journey, we encourage you to play around with your playlists.
Sure, you mightn’t particularly enjoy every piece you listen to, but remember, your opinion about whether it’s good or not isn’t actually the point. Broaden your musical horizons!
There’s plenty of ready-made analysis activities setup in the Music Teacher’s Digital Library, so why not use those to start building your word lists?
Happy analysing, everyone! – Deb
-
Ways to gamify beat in your music classroom.
Comments Off on Ways to gamify beat in your music classroom.Beat is defined as a regular movement or sound. In music, the beat is a regular, repeated pulse that helps create tempo or speed in music.
Really knowing beat can make all the difference for rhythm so don’t overlook the obvious and practice this concept regularly with all levels of students.
So, here’s a few suggestions for gamifying beat in your classroom, available via the Music Teachers’ Digital Library (note, some are free, but others are only accessible with a subscription).
A Qua Qua
Let’s start now with A Qua Qua, which is great for teaching & practicing beat. It’s also an opportunity for celebrating diverse music of different cultures as A Qua Qua is a traditional Israeli song.
Students sit in a single circle holding their hands out in front of the people beside them. Their left hand should face up under the person’s hand on their left and their right hand should face down on top of the person’s hand on the right.
Beginning on the first beat of the first full bar, the chosen first person takes their right hand cross their body and taps the person’s hand on their left thus “passing the beat”.
This person then does the same and so on around the circle on the beat. At the end of the song the student who gets tapped on the 5th beat is out unless they pull their hand away, in which case the person who moved to tap them is out. Students can speed up during the counting.
Mal Mal Mal
This song is great for working on the concept of melisma or the notion of beat passing patterns.
- Students sit in a circle with legs crossed and a stone, stick or other object in front of them on the floor.
- Keeping the beat, they pass the stone to the left around the circle.
- Beat 1: Pick up the stone.
- Beat 2: Place the stone in front of the person on the left.
- Repeat for the whole song
Categories
Categories is perfect for introducing the concept of beat, incorporating body percussion and ostinato,
as well as fostering individual singing skills.Students sit in a circle and clap the beat as a body percussion ostinato (e.g. clap, clap, click, click).
After the first line of the song is sung by the whole class, a chosen category (food, cars, countries, cities, colours etc.) is sung (usually by the teacher).
Going around the circle one at a time, students sing an item from the chosen category, improvising the names of objects in the given category. (Other categories could be types of cars, names of countries or cities, colours etc).
And remember…
Practical games and activities like those above are ideal.
They support an inclusive, sequential and developmental music literacy program to make sure your students really know musical concepts and elements.
Happy gaming, everyone! – Deb
-
3 First Nations activities for your music classroom
Comments Off on 3 First Nations activities for your music classroomRead on for ideas for how to use First Nations songs along with links to some great activities, available via the Music Teachers’ Digital Library (note, some are free, but others are only accessible with a subscription).
Wirrumu (The Moon), is an Indigenous lullaby sung in Yolngu Matha languages (from northeast Arnhem Land) & English, written, produced and recorded by Manuel Dhurrkay & Caiti Baker.
Their stunningly beautiful recording of this was published in “The Moon, The Mouse & The Frog: Lullabies from Northern Australia” by the Australian Broadcasting Corporation in 2021.
Inanayis an Indigenous Australian song or lullaby, thought to be in Yorta Yorta, the language of one of the Aboriginal tribes of Victoria. It has also been collected from Thursday Island and the Torres Strait Islands. A direct translation is unavailable; however, it is thought to be a song about a goanna (gupuana) with the ‘choo’ being the shooing away of the goanna.
As well as being a beautiful song to sing, it is also great for unconsciously highlighting 2 metre, the do pentachord and the anacrusis, discussing asymmetrical phrasing and introducing I IV V harmony.
This First Nations song Mumma Warrunno (Maranoa Lullaby),is from Southwest Queensland. It was collected and translated by H.O. Lethbridge and an arrangement, by Arthur S Loam, for voice and piano was published by Allan & Co in 1937 in a collection of three songs called “Australian Aboriginal Songs”.
Sung through twice – the first time through with lyrics in Gungarri, from South West Queensland, and the second time in English – this simple song is perfect for sequentially preparing / presenting / practicing la, unconsciously practicing 3 metre and teaching question & answer form.
Recorded Fun
Students compose new versions of a recorded song by writing a new melody for the given rhythm using only known notes.
- On the board is written the stick notation of the first sixteen beats (the first four bars are repeated three times to equal twelve bars) of Wirrumu (The Moon).
- Students sightread the rhythm on the board whilst conducting, then sing in solfa with handsigns several times.
- Students to listen to the first 33 seconds of Wirrumu (The Moon).
- Students discuss what they hear.
- Students create their own melody using the same rhythm, only do re mi so and la and the same question (repeated three times) and answer form.
Clickhereto access the activity: la – Late Practice: Creative & Written
Circle Song Notes
Groups of students sing allocated notes of a known song with movement.
- The teacher sings Mumma Warrunno while keeping a steady beat, on a neutral syllable e.g. “doo”.
- The class identifies the name of the song and sings the song with the words, showing the melodic contour in the air.
- The teacher sings the first phrase with the words and the class sing back in solfa with handsigns. Repeat for each phrase.
- The class sing the whole song in solfa with handsigns.
- Divide the class into four groups and allocate each group a note: do re mi or so. All groups are allocated la as well.
The four groups form circles in each corner of the room.
- Facing clockwise around their circles, students sing the song in solfa with handsigns slowly – as a lullaby – taking a small step forward every time they sing their allocated notes.
- Repeat f. showing the handsigns for all notes but only singing their allocated notes (either do re mi or so and la) out loud.
Clickhereto access the activity: la – Early Practice: Aural
Ostinato & Body Percussion
Once the song Inanay has been learned, the ostinato pattern can be added, performed first by the teacher as the whole class sing the song, then by half the class while the other half sing.

Once students can simultaneously clap the ostinato while singing the song, they can begin adding in the following body percussion actions.

Clickhereto access the song: Inanay
Happy exploring, everyone! – Deb
-
Top 10 Videos for Time Signatures
Comments Off on Top 10 Videos for Time Signatures
One of the exciting things about music learning in general—but Kodály-inspired approaches in particular—is how integrated all of the concepts are.
In order to really know rhythm, or stand a chance of transcribing rhythms or sightreading, you need a strong foundation in a variety of time signatures.
Understanding how they work and becoming familiar with different rhythmic groupings and ‘feels’ of simple & compound time is key.
To give you a bit of a starting point, here are 10 videos that combine teaching, learning and the application of all that—theory into practice.
DEB’S TOP 10 DSMusic Time Signature Teaching & Practice Videos
Start with the basics.
Try beginning with the concept of time signatures –
why we use them and what they tell us, starting with simple time.Compounding concepts!
Now we take what we’ve learned for simple time and apply it for compound time.
Now that we’ve got a few videos under our belt,
it’s time to expand–including transcriptions & tougher time signatures.How can DSMusic help?
If these ten videos aren’t quite enough to cover your time signature-related needs,
remember there’s a bunch more available for free, so carve out some time to deep-dive on
the DSMusic Vimeo & YouTube channels (and make sure you subscribe to stay updated)!Happy watching! – Deb
-
Top 10 music literacy tips to set up your school year!
Comments Off on Top 10 music literacy tips to set up your school year!
Look, let’s be honest, returning to school for a new year feels a little bit like coming out of a deep festive-season-holiday hibernation. The thought of showing up on day one and having your entire music theory approach planned out for the year can be daunting.
However, what you do on day one is actually super vital for a number of reasons. You might be kicking off with a brand spanking new class or in need of a gentle way to refresh what you’ve learned and ease into the school year. What you do music theory wise can set the tone for everything that follows. Here at DSMusic, we’re all about sequential music literacy and knowing, not just learning, so with that in mind, let’s chat through getting things off to a strong start.
DEB’S TOP 10 TIPS FOR TEACHERS & STUDENTS
1: Take it one step at a time: let’s get sequential.
The best music literacy programs have a sequential approach, but that basically just means little step-by-step increments in teaching and learning. This can work either by starting from the very foundation with a concept or skill, or in reverse — seeing what ‘knowing’ looks like and working backwards. For many, the end of the line is what will be on the exam, so if that helps, use that as your compass, just make sure you take the time to prepare, present and practice music theory.
2: Just keep listening, just keep listening.No matter what, listen. All the time. In class and out. For whatever needs to happen in those listening, analysing and responding moments, it’s a great idea to listen to as wide a variety of music as possible. Across styles, genres, instrumentation and artists. Listen for the feeling it creates, pay attention to the elements and devices that contribute to this and get into the habit early (and often!) of trying to note down what’s being heard.
3: Never fear, just inner hear.For what is usually quite a noisy subject — all that singing, playing and clapping — there is a way to listen to music on the page too, without any sound. Inner hearing, or thinking sound, is frankly the only way to handle dictations and transcriptions come exam time, but more than that, it’s an internal way of seeing what you hear and hearing what you see.
4: Move to the music.Here at DSMusic, we’re big on singing and setting that up as a staple in the classroom from the get-go, but sometimes folks just feel a bit too vulnerable to show off their pipes. Using body percussion and movement can be a great way to lean into the strengths of the entire class and can be as simple as walking the beat or as challenging as a particularly intense clever echo!
5: Connect the dots: make it relevant & authentic.Just like with the analysing we touched on earlier, which actually is there to help make us better performers, so too should music theory support what happens practically. Providing there’s some sequential scaffolding in place for the concept, you can take your lead from the lead sheet, or the notated score, or whatever’s happening repertoire wise. Analyse and sing the scales these pieces are based on, use rhythm names and Solfa to sightread new material or try inner hearing to support rote learning or memorisation.
Need a brain break? Brodie does!

6: Learning your musical ABC’s.Music classrooms are full of a mix of folks, with differing abilities, instruments (& keys!), musical tastes and assessment requirements, so why not go with the music theory option that is universal? Tonic Solfa or Moveable do Solfa is a system of note naming in which every note within a scale is given a name based on its relationship to the other notes within that key. Solfa shows us how to spell music – it’s a system for that in the same way the alphabet is for language.
7: Set yourself some ‘Deb deadlines’.It can be easy, even as early as Term 1, to start freaking out about upcoming tests, SACs and exams. When plotting things out, set up some ‘Deb deadlines’ — these pop up ahead of the actual date everything needs to be known by and act as a great progress check to help work out what still needs attention. We do dress rehearsals and mock exams for performance, why not for music theory too?
8: Get creative in order to really know.There’s a pretty huge list of ways you can teach, learn and practice certain music theory concepts, so while scribbling things down on a worksheet or watching a video or two are all well and good, don’t be scared to try something a little different. Composition is a terrific way to reinforce and consolidate understanding, and it also doubles as a means for finding authentic student voice. Why not try conducting during rhythmic dictations or singing scales in canon? This keeps things engaging in the classroom and ticks off concepts in different contexts.
9: Plan, print & laminate a practice chart so you really get into the routine.Just like anything, music practice is a skill that needs deliberate work, or, funnily enough, practice. We need to play/sing on our instrument regularly, and rehearse pieces and technical work during classes, in lessons and at home — and it’s the same for music theory. Set up a schedule, or some structure for practicing and make sure this gets time during the week in the same way homework for other classes do!
10: Strive for progress not perfection.Obviously everyone wants to pass and do well, and outcomes and assessments are important, but at the end of the day, the reason we’re all doing this is to become better musicians and performers, right? Or at least, the best musician we can be, which is more about building skills and capacities over time than it is getting everything note perfect!
How can DSMusic resources help you start strong?
There’s countless material on hand to structure out all your teaching, learning and knowing. The Musicianship & Aural Training Series includes 100s of worksheets, videos, listening exercises and more, while the Music Language Online Course Musicianship is a great way to deep-dive and double-down!
Other things to consider at the start of a new year:
- chances are there’s been little (or zero!) study or practice over the break so relish the opportunity to refresh
- learning intentions and outcomes are key – know what the endgame is, and roughly the way to get there so there’s no surprises
- remember that’s it’s never too late to learn Solfa!

Set your goals & strive towards progress!
After all that, the key takeaways really are to be kind to yourself (this goes for teachers and students) and do future you a favour by plotting out some preliminary steps and pinpointing your go-to resources. And remember — begin listening, singing and practicing from day one!
Happy back-to-schooling! – Deb
-
3 Ways to Use Flashcards in Your Music Classroom
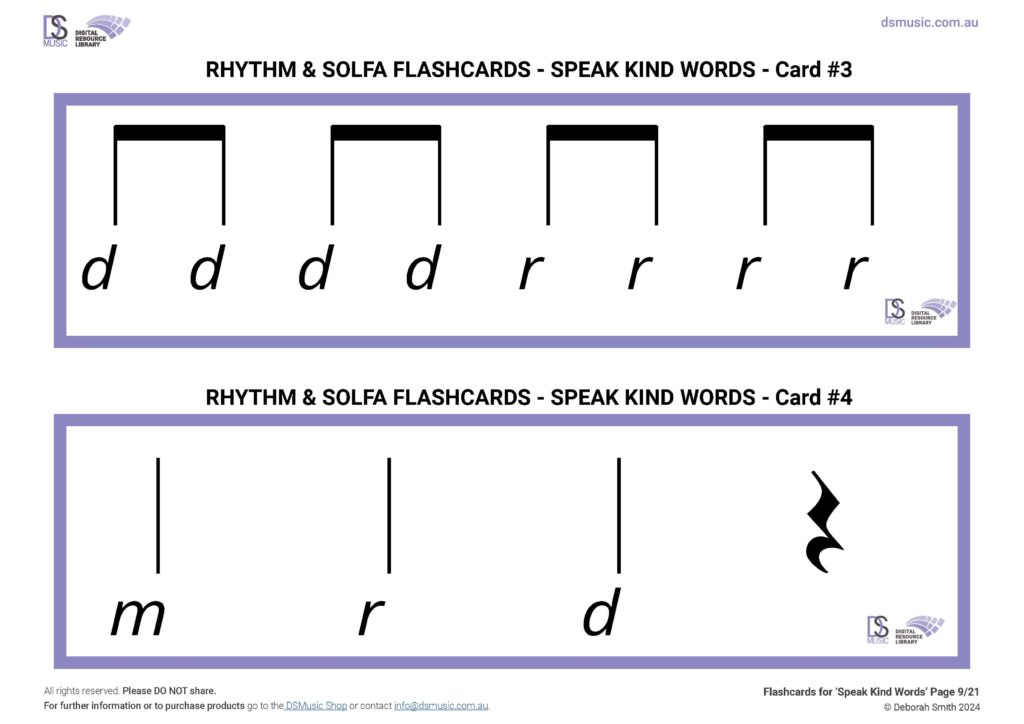
Comments Off on 3 Ways to Use Flashcards in Your Music ClassroomFlashcards have to be one of the most useful resources a teacher can have in their classroom!
Use them to save you having to write on the board or let the kids use them to recognise – and match the visual symbols to – what they hear. Use them to play a game with, to create with and to dictate from!
Flashcard activities can easily form a part of every music lesson, regardless of what stage of learning your class is at and are a great way to prepare for a transcription activity or any activities that use the elements targeted in the flashcards themselves.
Read on for lots of ideas for how to use Flashcards along with links to some great activities, available via the Music Teachers’ Digital Library (note, some are free, but others are only accessible with a subscription).
Sightreading
- Use flashcards that ONLY include known rhythms or pitches.
- Students should keep a steady beat (quietly) throughout the activity.
- Hold flashcards so students can see one at a time.
- Allow inner hearing time for each flashcard.
- Pointing to each beat on the card can help students follow.
- This video is an example of sightreading from Rhythmic Flashcards.
Click here to access Crotchets, Quavers, Crotchet Rests & Semiquavers Flashcards.
Sightreading Variations
- Poison Rhythm/Melody – where one rhythm (e.g. semiquavers) or pitch (e.g. so) is chosen and students must NOT say/sing those out loud (inner hear instead).
- Poison Rhythm/Melody – where one rhythm (e.g. crotchets) or pitch (e.g. re) is chosen and students must NOT say/sing those out loud (inner hear instead).
- Halvies – one half of the class say the rhythm name of the rhythm (e.g. crotchets) or pitch being focused on (e.g. la) while the other half say all else.
- Read and Remember – students memorise the first card being shown, when the second card is shown they have to say the rhythm names or sing the solfa/letter names of the first card while memorising the second and so on.
- FCBP – (Flashcard Body Percussion) choose a different action for each rhythmic element (or pitch) on the cards e.g. a crotchet may be clapped while semiquavers may be clicked and so on. Students inner hear the rhythm names as they perform the body percussion actions and the teacher keeps a steady beat on claves or similar.
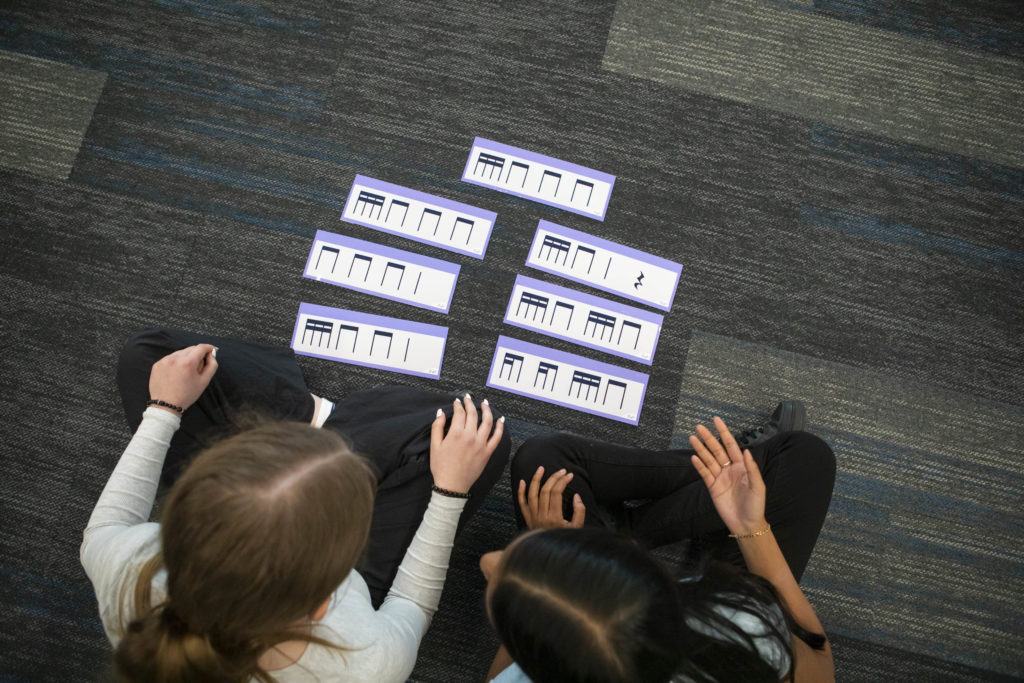
Build It Up
- Have flashcards with individual known rhythms (see Simple Time flashcards here) or pitches.
- Warm up the class by singing several songs that only use the rhythms and/or pitches on the individual rhythmic flashcards.
- Divide the class into teams and provide each team with a set of these flashcards. For example, 12 x crotchet cards, 8 x pairs of quaver cards and 5 x crotchet rest cards will ‘make’ most Crotchets, Quavers and Crotchet Rests songs.
- Announce the name of the song you have chosen and start a stopwatch. The teams begin to create the rhythm and/or melody of that song using the above cards.
- When one team thinks they have it correctly the clock is stopped and all teams cease working.
- The team that thinks they have it sing the rhythm names/solfa of the song. If correct, they win, if incorrect, the clock is started again and the activity continues until one team has the song correctly.
Click here to see an example of this practice activity using flashcards.
How can DSMusic resources support you?
There’s a ever-growing collection of flashcard resources in the Music Teachers’ Digital Library (MTDL), so click here to view these.
There’s also an extended version of this blog post available to MTDL subscribers with a lot more suggestions, activities, links and strategies for finding the fun in flashcards!

And remember…
Whether you’re looking for a way to gamify rhythm, throw in a few brain breaks or offer your classes lots of different ways to practice these musicianship concepts, flashcards are a great go-to!
Happy flashcarding, everyone! – Deb
-
Top 10 Videos for Scales & Key Signatures
Comments Off on Top 10 Videos for Scales & Key SignaturesThe aim of the game here at DSMusic is sequential music literacy and really knowing. This means step-by-step teaching and learning of music aural and music theory concepts, followed by the practicing of these in a variety of ways.
Scales and key signatures (tonality) are a vital part of any music literacy approach. They pop up everywhere – whether you’re using them visually when sightreading, aurally recognising them in the senior years or memorising them to play (or write) in exams.
They’re the cornerstone of much of what we do as musicians in performance, creative pursuits and come assessment day, so it’s vital to incorporate them early and often.
Aside from using mnemonics to remember your key signatures, or hours and hours of muscle memory for reeling them off when you need to, how can we practice and really know our scales?
To give you a bit of a starting point, here are 10 videos that combine teaching, learning and the application of all that — theory into practice.
DEB’S TOP 10 DSMusic Scales & Key Signatures Teaching & Practice Videos
1: Start with the basics.
Try beginning with the concept of key signatures – why we use
them and what they tell us, before tackling finding tonalities visually and aurally.2: It’s all relative!
Explore two basic scales forms – Major and natural minor – and discover
how these work and how they’re related.3: Let’s get singing scales & practicing them!
Now that we’ve got a few videos under our belt, it’s time to use
sing through some different scales to build our aural awareness.How can DSMusic help?
If these ten videos aren’t quite enough to cover your
scales & key signature-related needs, remember there’s a bunch
more available for free, so carve out some time to deep-dive
on the DSMusic Vimeo & YouTube channels!Happy watching! – Deb
-
4 FREE compositional device resources for music performance analysis
Comments Off on 4 FREE compositional device resources for music performance analysisAs part of the 2023-2027 VCE Music Study Design, music analysis or music performance analysis now incorporates four compositional devices. These, alongside the elements of music, offer students the means to identify and discuss how performer’s achieve intended effects and characters. This, in turn, supports students with their own development as musicians and performers; fostering language and an awareness of these techniques.
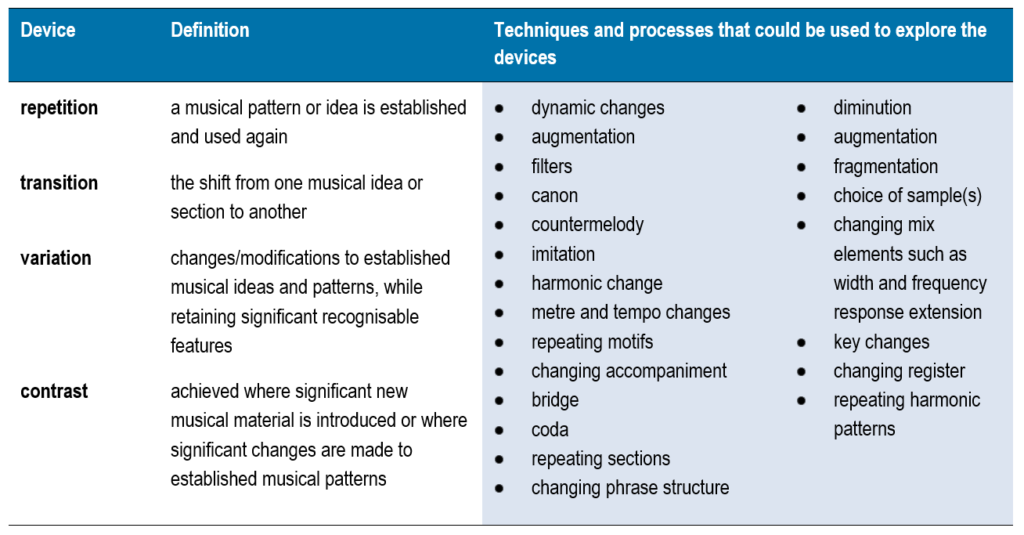
Pg16, VCE Music Study Design | Victorian Curriculum & Assessment Authority The four devices outlined by the Victorian Curriculum & Assessment Authority (VCAA) include contrast, variation, transition and repetition.
VCAA also provides ways for students to explore these within excerpts, taking something that might initially feel a little abstract and grounding it in a music analysis aural space.
It’s important to refer to the VCAA definitions for these, as they do have to relate specifically to the unifying theme of ‘musical ideas (or patterns)’. Often, too, these devices are incorporated into multi-part questions where they are either the focus, or an option for discussing how they impact on the character created.
So, let’s go through these a little more now.
Compositional Device #1: CONTRAST
As you can see above, VCAA defines contrast as “significant new musical material” or “significant changes to established patterns”.
It can be helpful then to think of this as ‘obvious’ changes within an excerpt which can often be easier to hear. This might include a change in key/tonality (e.g. major to minor), changes in tempo or dynamics (e.g. soft to very loud) or contrasting articulation techniques (e.g. staccato and then legato).

Although these more obvious elements and techniques can be simpler to detect, contrast can also be explored by considering texture, instrumentation and melodic contour. Note the specified timings below and see if you can hear this in the Bon Iver excerpt.

Click to hear this on Youtube Or, perhaps, you could listen out for contrast in phrasing or the instrument registers being used, like with this saxophone quartet example.

Click to hear this on Youtube Compositional Device #2: VARIATION
As you can see above, VCAA defines variation as “changes to establish musical ideas and patterns” that very importantly, “retain significant recognisable features.”
It might be tempting to think about this very similarly to contrast (changes!) but for instance, where we might talk about contrast in relation to the use of different articulation approaches or shifts in texture overall within an excerpt, with variation we would instead discuss how the performance of a main thematic idea varies each subsequent time we hear it.
Just like with contrast, we can identify variation through elements, such as articulation and melodic contour. Note the specified timings below and see if you can hear this in the Paganini excerpt.

Click to hear this on Youtube Or, perhaps, you could listen out for texture, instrumentation and tone colour, like with this boy wizard example.

Click to hear this on Youtube Compositional Device #3: TRANSITION
As you can see above, VCAA defines transition as “the shift from one musical idea or section to another.”
So this device has a lot to do with transitional passages in music, connecting ideas together, like a bridge in a song. However, it can also be a little more subtle, such as a passage where modulation occurs or when the excerpt shifts through the use of a sound production transition effect like a wipe or vocal riser.
These passages can be lengthy within an excerpt, or a little shorter, and can be identified by listening for texture, rhythm and phrasing. Note the specified timings below and see if you can hear this in the Pharrell Williams excerpt.

Click to hear this on Youtube Or, perhaps, you could listen out for transition in instrumentation, melodic contour or the instrument registers being used, like with this Koehne example.

Click to hear this on Youtube Compositional Device #4: REPETITION
As you can see above, VCAA defines repetition as when “a musical pattern or idea is established and used again”.
Again, sometimes we can fall into the trap of thinking about variation here, but instead of identifying how a musical pattern or idea varies through the use of say melodic contour, register or rhythm overall as an excerpt progresses, with repetition we would instead discuss exact points where established ideas appear again while retaining consistent approaches and character.
The use of repetition can create a sense of stability for the listener, however, it can also build tension. Consider register, rhythm and tone colour as you note the specified timings below, seeing if you can hear this in the Sarah Neufeld excerpt.

Click to hear this on Youtube Or, perhaps, you could listen out for repetition in texture, phrasing or melody, like with this Hans Zimmer example.

Click to hear this on Youtube How can DSMusic resources support you?
You can find additional excerpt examples for each device to consider, as well as some sample observations for a few too. This would be a great way to work through a device type with students, and then set them ‘your turn’ examples to continue refining their skills.
If you already own Decoding Sound, then these are available within your digital resources (alongside more music analysis in-depth looks at character, elements and answering questions!). Otherwise, you can access the four FREE info sheets for each compositional device below, so long as you have a DSMusic account.

And remember…
The best way to build your confidence with music analysis and compositional devices is to listen! The more excerpts you engage with, the more likely you are to be able to identify aurally what’s happening and the effect this has musically. Just like you might have a preferred element to write about (I’m a big fan of articulation and tone colour, myself!) you’ll probably find contrast a great first device with which to start.
Happy analysing! – Deb